Learn how to – Import CentOS 8 | CentOS 7 Qcow2 Images on OpenNebula.
OpenNebula is a cloud computing platform that helps you with the management of distributed data center infrastructures. The OpenNebula platform is able to manage data center’s virtual infrastructure to ease building of private, public and hybrid Infrastructure as a Service solutions. One of the key steps before provisioning Virtual Machines on OpenNebula is definition of VM Templates, which depends on OS images.
In this article we will guide OpenNebula users through the steps of importing CentOS 8 and CentOS 7 Qcow2 OS images to OpenNebula image datastore. Before you perform this operation confirm the image datastore is available and ready for use. In the diagram the Image type datastore is named “default“.
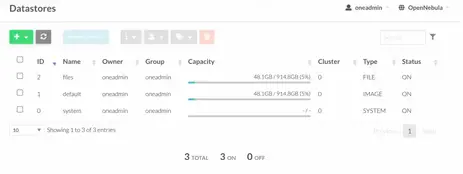
Step 1: Get CentOS 8 | CentOS 7 Qcow2 image URLs
You can create custom Qcow2 image by yourself or use publicly available Cloud images from CentOS team.
For CentOS 8 Qcow2 cloud image, visit the CentOS 8 Qcow2 images downloads link and copy the URL path of the latest available release.
# Latest of this article update
wget https://cloud.centos.org/centos/8-stream/x86_64/images/CentOS-Stream-GenericCloud-8-20220125.1.x86_64.qcow2
For CentOS 7 Qcow2 images, visit CentOS 7 Cloud images download link:
https://cloud.centos.org/centos/7/images/CentOS-7-x86_64-GenericCloud.qcow2Step 2: Upload CentOS Qcow2 image to OpenNebula Datastore
Once you have the URL for downloading the image, or locally built qcow2 image, login to OpenNebula Sunstone console.

Then go to “Storage” > “Images” section.

Click on “+” and choose “Create“.

Fill the required values required to create the image.
Here is my CentOS 8 image values populated:
- Image Name – CentOS8
- Images Description – CentOS 8 Qcow2 image
- Image Type – Operating System Image
- Datastore where image is stored – default (Image Type datastore)
- Image location – URL or Upload from local disk – Copied from CentOS 8 Qcow2 images
- Optional Advanced Options – BUS driver (Virtio) and image mapping driver (qcow2)

You can add more settings that suit you and hit the “Create” button when done.

The same procedure can be used to add CentOS 7 Qcow2 image:

Note that the images will be in locked stated as they’re being added to datastore.

Once ready the Status will change to “READY“.

We’ve successfully uploaded CentOS 8 and CentOS 7 qcow2 images to OpenNebula datastore. In our next article we will cover creation of VM Templates and actual Virtual Machines provisioning on OpenNebula platform.
More articles on OpenNebula:
- Install OpenNebula KVM Node on Debian
- How To Configure NFS Filesystem as OpenNebula Datastores
- Create and Use Bridged Networks in OpenNebula VMs





















Leave a Reply
You must be logged in to post a comment.