In this post, you are going to create a Cloud SQL MySQL instance in Google Cloud Platform and connect it to Compute Engine VM Instance.
Prerequisites
- Your Compute Engine Instance running and installed Nginx and PHP.
- For setting up Compute Engine, see the Setting up Compute Engine Instance.
- For installing Nginx and PHP, see how to install LEMP in Compute Engine Instance.
- Domain name is pointed to your virtual machine.
- For setting up Cloud DNS, see the Setting up Google Cloud DNS for your domain.
Creating a Second Generation instance
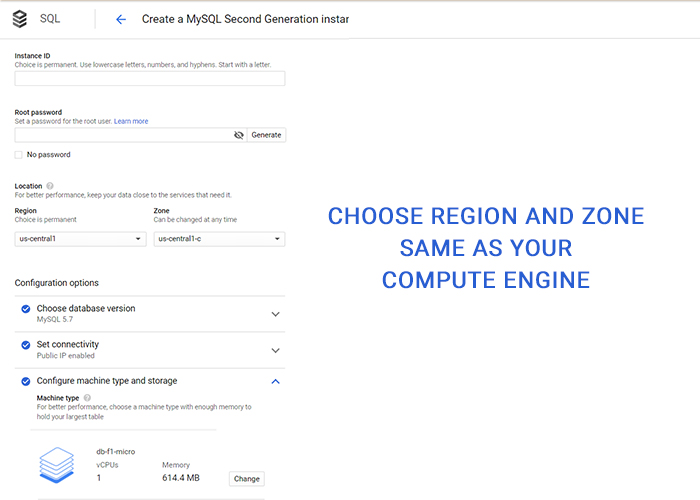
- Go to Storage >> Cloud SQL in GCP console.
- Click Create Instance.
- Select MySQL and click next.
- Click Choose Second Generation.
- Enter instance name (recommended to use your domain name without the .com or .co.eu extension).
- Enter the password for the root user and copy it safe.
- Set the region for your instance the same as you set in your Compute Engine VM Instance.

Under Configuration options update the following
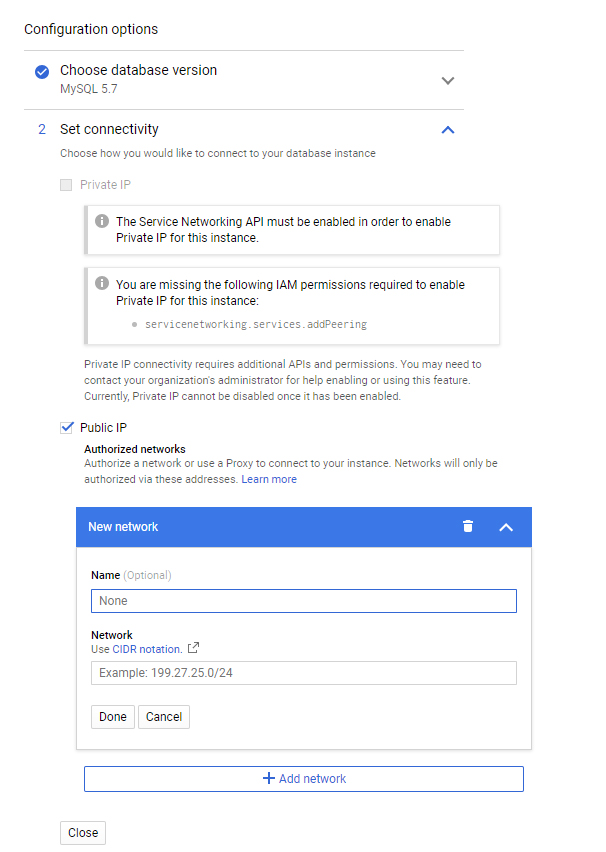
- Click set Connectivity, and under Authorized Networks click Add Networks.
- Enter the
namein the Name field (this is optional). - Enter your
Compute Engine Instance IP addressin the Network field. - Click Done.
This setting will authorize your Compute Engine VM Instance to connect to this Cloud SQL Instance.

Click Configure machine type and storage and choose Micro Instance
Choose SSD in Storage type
Leave everything to default and click create.
It will take some time to create a new Cloud SQL instance.
Creating a database and a user
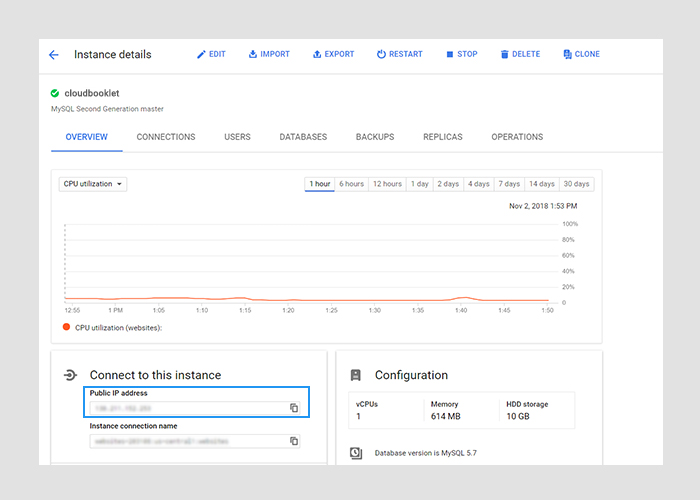
Once your instance is created click on the instance name to view all details of the instance.
Here in the Overview tab, you can find the Public IP address in the Connect to this instance.
This IP address is the MySQL hostname you need to provide while installing WordPress.

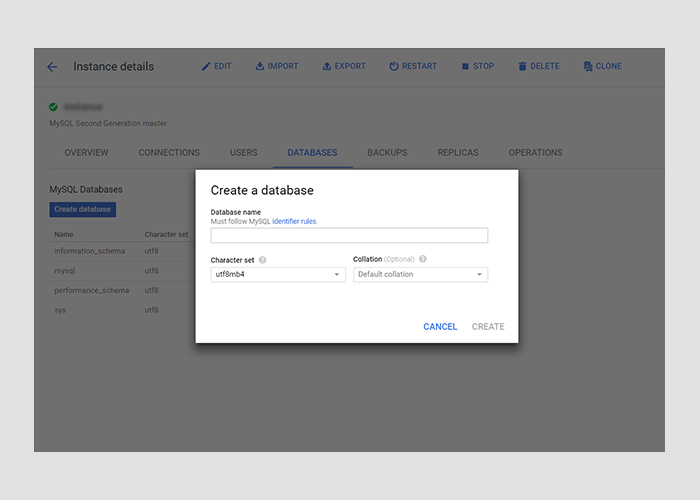
Now click on the Database tab and create a new database by clicking the Create Database button.
Enter your desired database name and choose Character set to utf8mb4 and click Create.

After creating the database, click on Overview tab and click connect using Cloud Shell which can be found in the Connect to this instance section.
Once the Cloud shell is opened the default gcloud command will be automatically populated and you need to hit enter. So hit Enter
Now you will see Whitelisting your IP for 5 minutes...
You will be prompted to enter the password for root.
Enter the password you just created while creating the instance.
You will be logged in to Cloud SQL instance and now can run the following commands one by one.
Note: Replace username with your username, password with your password and database_name with the database name you just created.
CREATE USER 'username'@'%' IDENTIFIED BY 'password';
GRANT ALL PRIVILEGES ON database_name.* TO username@'%';
FLUSH PRIVILEGES;
exit;
Why do we use Cloud Shell to create a user?
The users that are created using the Cloud Console have the same privileges as the root user. So we created using Cloud Shell to have privileges to a certain database.
Alright, now you have created a database and assigned a user to that database and granted privileges for that user. Now you are ready to set up WordPress.
Leave a Reply
You must be logged in to post a comment.