Cloud DNS – How to Transfer your Domain to Google Cloud DNS. DNS (Domain Name System) is a distributed database which translates domain to IP address.
This guide explains how to migrate your DNS records to Google Cloud DNS with fastest propagation, reliable with low latency.
Commonly used DNS Records
- A Record – IPv4 address, maps IP of the host with a domain.
- AAAA Record – IPv6 address, mainly used in HTTP(S), SSL Proxy, and TCP Proxy Load balancing.
- CNAME – Alias for one name to another (www.domain.com, points to domain.com)
- MX – Manages where emails should be delivered.
- TXT – Any text content, like domain owner verification text or something like that
Why use Google Cloud DNS?
- Managed by Google and it’s fast, reliable and secure with low-latency.
- Uses Anycast (requests are rooted to nearest location).
- Low Pricing (0.2/month per zone).
How to point your domain to Google Cloud DNS?
Go to Network Services >> Cloud DNS in your GCP Console
Click Create Zone
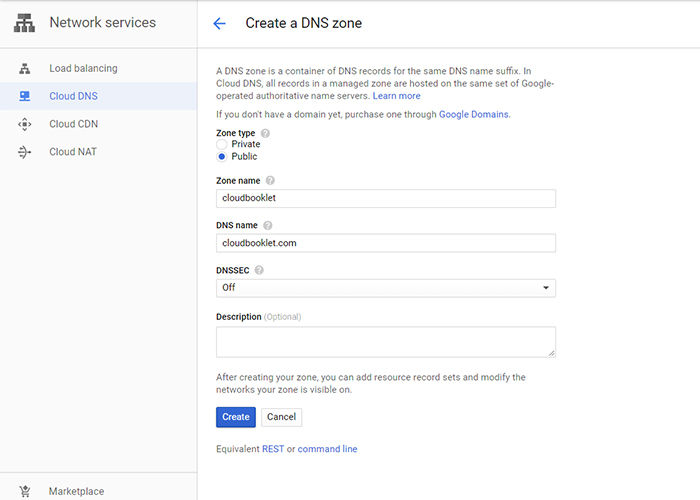
Choose Public for the Zone type.
Enter your desired name (recommended to use your domain name without extension .com or .co.au) for the Zone name
Enter your domain name for the DNS name. For example, domain.com.
Keep the Off setting selected for DNSSEC.
Click Create.
Create Cloud DNS Zone
Once the DNS zone is created you will be provided with default four NS records and SOA records.
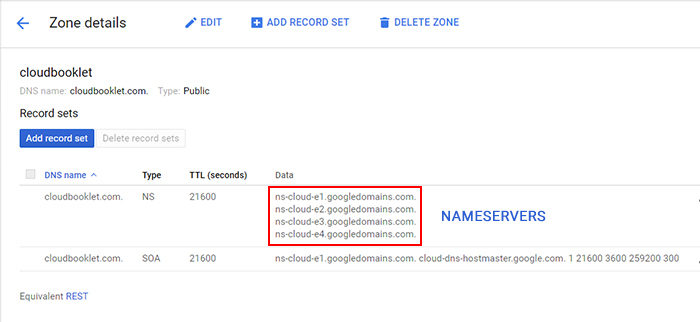
Now you can start migrating your DNS records from your existing domain registrar. There are some important records that needs to be migrated, they are
A Recordthis the main record which holds the IP address of your server.CNAME Recordthis is alias one name to another.MX Recordthis record is for your email server to work
These 3 records needs to be migrated in-order for the new DNS server to work.
Transfer A records
The A Record with the name @ is the main records with the IP address of the server. So go ahead and add the record in your Cloud DNS.
- Click Add record set.
- Select Resource Record Type to “A”.
- IPv4 Address with the IP address of your instance that you have reserved earlier.
- Leave everything to default.
- Click create
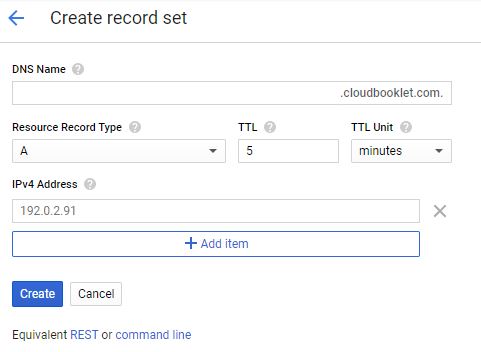
If you have any additional A records which is necessary you need to add those also.
Transfer CNAME records
Next one is the CNAME Records, this is an alias to the domain name. For example the CNAME Record with name www and value with domain name will resolve to the IP address of your main A Record with name @
Let’s go ahead and transfer the CNAME records.
- Click Add record set.
- Enter DNS name “www”.
- Select Resource Record Type to “CNAME”.
- Canonical name as your domain name followed by a period (domain.com.).
- Leave everything to default.
- Click create
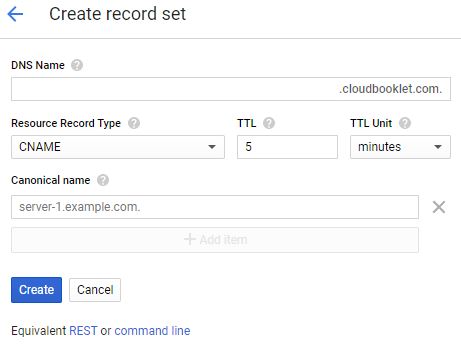
If you have any additional CNAME records you need to migrate them also.
Transfer MX records
Now you can migrate the MX records. If you didn’t migrate your MX records you emails won’t work once your update the name-servers in your domain to use the Cloud DNS.
So, don’t forget to transfer these records.
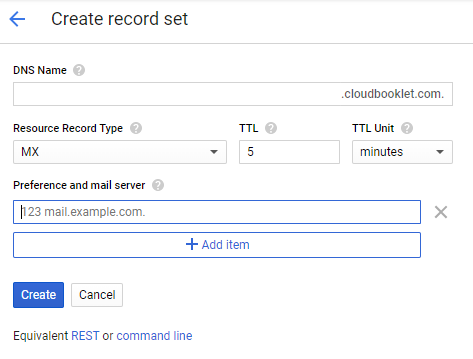
- Click Add record set.
- Select Resource Record Type to “MX”.
- In the Preference and mail server enter the priority and the the server name (0 mail.server.com).
- If you have multiple servers add them one by one. Gsuite has 5 MX records. So you can add them one by one.
- Click create
Transfer TXT records
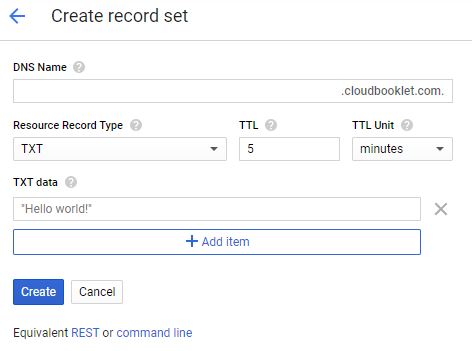
You can transfer other important TXT records. Some records like DKIM, SPF are added in the form of TXT records. So you need to transfer these records also.
Update your Domain nameservers
Once you have migrated all your records, you can update the nameservers of your domain name to the nameservers provided by Cloud DNS.
Login to your domain registrar (for example Google Domains) and go to DNS settings.
Select Use custom name servers.
Add the four NS records provided to you when you created the zone for your domain.
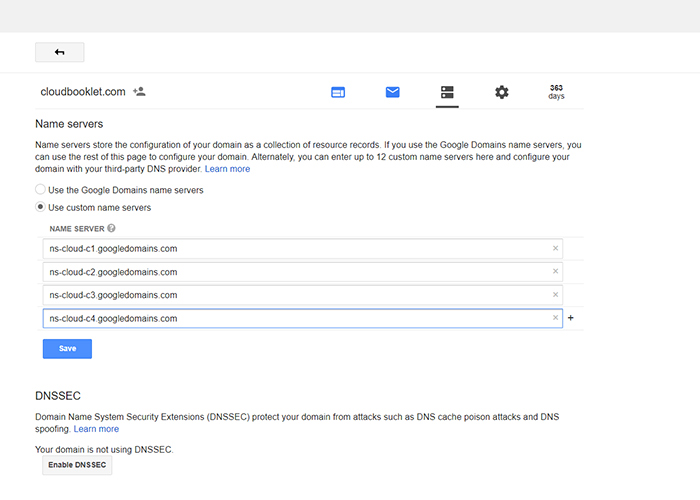
Save your settings.
Get your Professional Google Cloud Architect certificate with this easy to learn course now.
Now your domain name is using Google Cloud DNS. The DNS changes will take almost 4 hrs to propagate. So, wait until propagation to have a secure, fast DNS setup.







Leave a Reply
You must be logged in to post a comment.