Set Up Prisma Server for GraphQL on Ubuntu 18.04 – Google Cloud. Prisma is a replacement for traditional ORMs and used to build GraphQL servers, REST APIs, microservices and more.
In this
This tutorial is tested on Google Cloud Platform with Compute Engine VM Instance and Cloud SQL. It will work on all Ubuntu systems.
Prerequisites
- Your Compute Engine Instance running.
- For setting up Compute Engine, see the Setting up Compute Engine Instance.
- Ubuntu server setup on Google Cloud.
- Google Cloud SQL Setup, see Setup Cloud SQL and connect with Compute Engine.
- How to install Docker on Ubuntu 18.04 LTS.
- Install Docker Compose with Docker on Ubuntu 18.04.
- Node.js and NPM installed
in your local computer.
Install Prisma with Docker Compose
Docker Compose allows you to manage and run multi-container applications. YOu can use it to set up the infrastructure required for Prisma service.
SSH to your VM Instance and navigate to your project directory. In our case it will be my-project
Create a new docker-compose.yml file for Prisma server configuration. This will automatically spin up your Prisma and connect to Cloud SQL and configure it easily.
Make sure you replace the following contents in your docker-compose.yml file.
- managementApiSecret:
YOUR_SECRET - host:
CLOUD_SQL_IP_ADDRESS - user:
USERNAME - password:
PASSWORD
Execute the following command to create the docker-compose.yml file.
sudo nano docker-compose.yml
Paste the following contents and CTRL + XYEnter
version: "3"
 services:
   prisma:
     image: prismagraphql/prisma:1.23.4
     restart: always
     ports:
       - "4466:4466"
     environment:
       PRISMA_CONFIG: |
         port: 4466
         managementApiSecret: YOUR_SECRET
         databases:
           default:
             connector: mysql
             host: CLOUD_SQL_IP_ADDRESS
             port: 3306
             user: USERNAME
             password: PASSWORD
             migrations: true
This configuration pulls the latest version of Prisma and connect to port 4466. It also set the configurations to connect to Cloud SQL.
Now you can start the docker containers in detached mode.
sudo docker-compose up -d
Once the containers are created you can view the running containers using the following command.
sudo docker ps
You will get an output similar to the one below.
Output
CONTAINER ID        IMAGE                         COMMAND                  CREATED            STATUS              PORTS                    NAMES
645865e010bc        prismagraphql/prisma:1.23.4   "/bin/sh -c /app/sta…"   3 minutes ago      Up 3 minutes        0.0.0.0:4466->4466/tcp   my-project_prisma_1
Prisma server is setup and connected to Cloud SQL, you can now deploy your Prisma service from local system.
Setup Firewall
As Prisma server is listening on port 4466, you need to allow connections on this port.
So navigate to VPC Network >> Firewall rules and create a firewall rule.
Provide a name.
In Targets select All instances in the network
In Source IP ranges enter 0.0.0.0/0
In Protocols and ports check tcp and enter 4466
Click Create.
Install Prisma Local Environment
Create a new directory for your Prisma files and navigate into it.
npm install -g prisma
Create a new file structure for a new Prisma database API, which generates the files necessary to build your application.
prisma init hello-world
You will see an interactive prompt to select one of the servers. Choose Use other server and press ENTER
Output
  Set up a new Prisma server or deploy to an existing server?

  You can set up Prisma for local development (based on docker-compose)
  Use existing database      Connect to existing database
  Create new database        Set up a local database using Docker

   Or deploy to an existing Prisma server:
   Demo server                Hosted demo environment incl. database (requires login)
 ❯ Use other server           Manually provide endpoint of a running Prisma server
Then you need to provide the endpoint of your Prisma server. That will be your VM Instance External IP address with 4466 (http://EXTERNAL_IP_ADDRESS:4466).
Output
Enter the endpoint of your Prisma server http://EXTERNAL_IP_ADDRESS:4466
Next you need to enter your management API secret.
Output
Enter the management API secret YOUR_SECRET
Next choose the default for service name and stage
Select the programming language as Prisma TypeScript Client for the Prisma Client.
Output
Select the programming language for the generated Prisma client (Use arrow keys)
❯ Prisma TypeScript Client
  Prisma Flow Client
  Prisma JavaScript Client
  Prisma Go Client
  Don't generate
Once this is completed 3 files has been created and your application is ready to deploy.
Output
Created 3 new files:
   prisma.yml           Prisma service definition
   datamodel.prisma    GraphQL SDL-based datamodel (foundation for database)
   .env                 Env file including PRISMA_API_MANAGEMENT_SECRET

Next steps:
   1. Open folder: cd hello-world
   2. Deploy your Prisma service: prisma deploy
   3. Read more about deploying services:
      http://bit.ly/prisma-deploy-services

   Generating schema… 27ms

   Saving Prisma Client (TypeScript) at D:prismahello-worldgeneratedprisma-client
Deploy to Prisma Server
Move into directory.
cd hello-world
Deploy your Prisma service from local to the Prisma server.
prisma deploy
You will see an output similar to this.
Output
Creating stage dev for service hello-world √
Deploying service hello-world to stage dev to server default 2.0s

Changes:

  User (Type)
  + Created type User
  + Created field id of type GraphQLID!
  + Created field name of type String!
  + Created field updatedAt of type DateTime!
  + Created field createdAt of type DateTime!

Applying changes 2.4s

Your Prisma GraphQL database endpoint is live:

   HTTP:  http://EXTERNAL_IP_ADDRESS:4466/hello-world/dev
   WS:    ws://EXTERNAL_IP_ADDRESS:4466/hello-world/dev
Now you can connect to two different endpoints.
- The management Interface:
http://EXTERNAL_IP_ADDRESS:4466/management, where you can manage and deploy Prisma services. - The GraphQL API:
http://EXTERNAL_IP_ADDRESS:4466/hello-world/dev
Run a GraphQL query
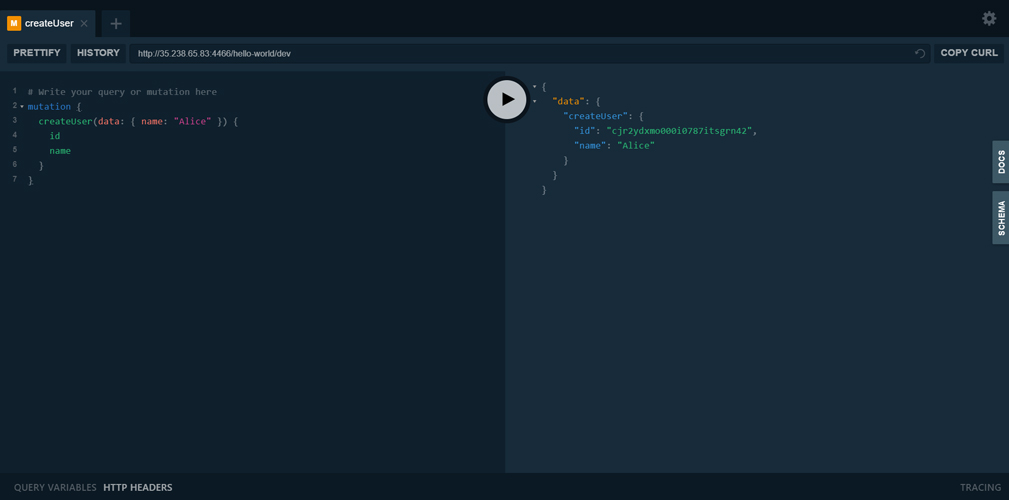
Go to your web browser and visit http://EXTERNAL_IP_ADDRESS:4466/hello-world/dev . You can experiment with the GraphQL playground.

Here you can test by sending a mutation to create a user. Run the following mutation on the left side of the GraphQL Playground.
mutation {
    createUser(data: { name: "Alice" }) {
        id
        name
    }
}
Once you hit the play button, you will see the results on the right side.

Now you have a Prisma server and service running on your server, and tested queries in GraphQL’s IDE.
Leave a Reply
You must be logged in to post a comment.