Learn how to – Send Logs to Splunk on Kubernetes using Splunk Forwarder.
Logging is a useful mechanism for both application developers and cluster administrators. It helps with monitoring and troubleshooting of application issues. Containerized applications by default write to standard output. These logs are stored in the local ephemeral storage. They are lost as soon as the container. To solve this problem, logging to persistent storage is often used. Routing to a central logging system such as Splunk and Elasticsearch can then be done.
In this blog, we will look into using a splunk universal forwarder to send data to splunk. It contains only the essential tools needed to forward data. It is designed to run with minimal CPU and memory. Therefore, it can easily be deployed as a side car container in a kubernetes cluster. The universal forwarder has configurations that determine which and where data is sent. Once data has been forwarded to splunk indexers, it is available for searching.
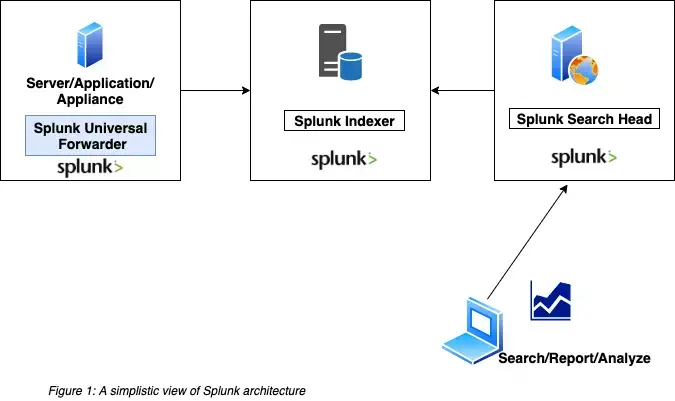
The figure below shows a high level architecture of how splunk works:

Benefits of using splunk universal forwarder
- It can aggregate data from different input types
- It supports autoload balancing. This improves resiliency by buffering data when necessary and sending to available indexers.
- The deployment server can be managed remotely. All the administrative activities can be done remotely.
- Splunk Universal Forwarders provide a reliable and secure data collection process.
- Scalability of Splunk Universal Forwarders is very flexible.
Setup Pre-requisites:
The following are required before we proceed:
- A working Kubernetes or Openshift container platform cluster
- Kubectl or oc command line tool installed on your workstation. You should have administrative rights
- A working splunk cluster with two or more indexers
STEP 1: Create a persistent volume
We will first deploy the persistent volume if it does not already exist. The configuration file below uses a storage class cephfs. You will need to change your configuration accordingly. The following guides can be used to set up a ceph cluster and deploy a storage class:
- Install Ceph 15 (Octopus) Storage Cluster on Ubuntu
- Ceph Persistent Storage for Kubernetes with Cephfs
Create the persistent volume claim:
$ vim pvc_claim.yaml
kind: PersistentVolumeClaim
apiVersion: v1
metadata:
  name: cephfs-claim
spec:
  accessModes:
    - ReadWriteMany
  storageClassName: cephfs
  resources:
    requests:
      storage: 1Gi
Create the persistent volume claim:
kubectl apply -f pvc_claim.yamlLook at the PersistentVolumeClaim:
$ kubectl get pvc cephfs-claim
NAME            STATUS   VOLUME                                     CAPACITY   ACCESS MODES   STORAGECLASS   AGE
cephfs-claim     Bound    pvc-19c8b186-699b-456e-afdc-bcbaba633c98   1Gi       RWX            cephfs          3s
STEP 2: Deploy an app and mount the persistent volume
Next, We will deploy our application. Notice that we mount the path “/var/log” to the persistent volume. This is the data we need to persist.
$ vim test-pod.yaml
apiVersion: v1
kind: Pod
metadata:
  name: test-app
spec:
  containers:
  - name: app
    image: centos
    command: ["/bin/sh"]
    args: ["-c", "while true; do echo $(date -u) >> /var/log/test.log; sleep 5; done"]
    volumeMounts:
    - name: persistent-storage
      mountPath: /var/log
  volumes:
  - name: persistent-storage
    persistentVolumeClaim:
      claimName: cephfs-claim
Deploy the application:
kubectl apply -f test-pod.yamlSTEP 3: Create a configmap
We will then deploy a configmap that will be used by our container. The configmap has two crucial configurations:
- Inputs.conf: This contains configurations on which data is forwarded.
- Outputs.conf : This contains configurations on where the data is forwarded to.
You will need to change the configmap configurations to suit your needs.
$ vim configmap.yaml
kind: ConfigMap
apiVersion: v1
metadata:
  name: configs
data:
  outputs.conf: |-
    [indexAndForward]
    index = false

    [tcpout]
    defaultGroup = splunk-uat
    forwardedindex.filter.disable = true
    indexAndForward = false

    [tcpout:splunk-uat]
    server = 172.29.127.2:9997
  # Splunk indexer IP and Port
    useACK = true
    autoLB = true

  inputs.conf: |-
    [monitor:///var/log/*.log]
    # Where data is read from
    disabled = false
    sourcetype = log
    index = microservices_uat  # This index should already be created on the splunk environment
Deploy the configmap:
kubectl apply -f configmap.yamlSTEP 4: Deploy the Splunk universal forwarder
Finally, We will deploy an init container alongside the splunk universal forwarder container. This will help with copying the configmap configuration contents into the splunk universal forwarder container.
$ vim  splunk_forwarder.yaml
apiVersion: apps/v1
kind: Deployment
metadata:
  name: splunkforwarder
  labels:
    app: splunkforwarder
spec:
  replicas: 1
  selector:
    matchLabels:
      app: splunkforwarder
  template:
    metadata:
      labels:
        app: splunkforwarder
    spec:
      initContainers:
       - name: volume-permissions
         image: busybox
         imagePullPolicy: IfNotPresent
         command: ['sh', '-c', 'cp /configs/* /opt/splunkforwarder/etc/system/local/']
         volumeMounts:
         - mountPath: /configs
           name: configs
         - name: confs
           mountPath: /opt/splunkforwarder/etc/system/local
      containers:
       - name: splunk-uf
         image: splunk/universalforwarder:latest
         imagePullPolicy: IfNotPresent
         env:
         - name: SPLUNK_START_ARGS
           value: --accept-license
         - name: SPLUNK_PASSWORD
           value: *****
         - name: SPLUNK_USER
           value: splunk
         - name: SPLUNK_CMD
           value: add monitor /var/log/
         volumeMounts:
         - name: container-logs
           mountPath: /var/log
         - name: confs
           mountPath: /opt/splunkforwarder/etc/system/local
      volumes:
       - name: container-logs
         persistentVolumeClaim:
            claimName: cephfs-claim
       - name: confs
         emptyDir: {}
       - name: configs
         configMap:
           name: configs
           defaultMode: 0777
Deploy the container:
kubectl apply -f splunk_forwarder.yamlVerify that the splunk universal forwarder pods are running:
$ kubectl get pods | grep splunkforwarder
splunkforwarder-7ff865fc8-4ktpr                 1/1     Running            0          76s
STEP 5: Check if logs are written to splunk
Login to splunk and do a search to verify that logs are streaming in.

You should be able to see your logs.
OpenShift Courses:
Practical OpenShift for Developers – New Course 2021
Ultimate Openshift (2021) Bootcamp by School of Devops
Related guides:
Secure Access to Linux Systems and Kubernetes With Teleport
How To Send OpenShift Logs and Events to Splunk
How To Stream Logs in AWS from CloudWatch to ElasticSearch
How To Ship Kubernetes Logs to External Elasticsearch
Leave a Reply
You must be logged in to post a comment.