Kubernetes Basic PHP Application with Nginx on Google Cloud. Kubernetes is an open source container orchestration system. It allows you to create, update, and scale containers without any downtime.
In this tutorial, you will deploy a PHP 7.3 application on a Kubernetes cluster created with Kubernetes Engine on Google Cloud with Nginx and PHP-FPM running in separate containers.
You will also learn how to keep your configuration files and application code outside the container image using persistent volumes. You will also expose your application to the internet with Load B
Prerequisites
- A Google Cloud Account and a project with billing enabled.
01. Create a Kubernetes Cluster
Go to your Google Cloud Console and navigate to Compute >> Kubernetes Engine.
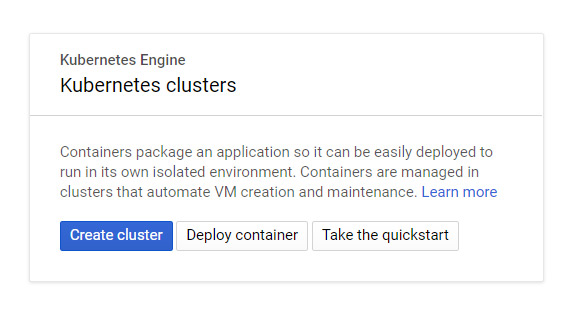
Click Create Cluster.
Enter your Cluster name, choose your zone, master version, machine types and once you have made your selections, click Create.
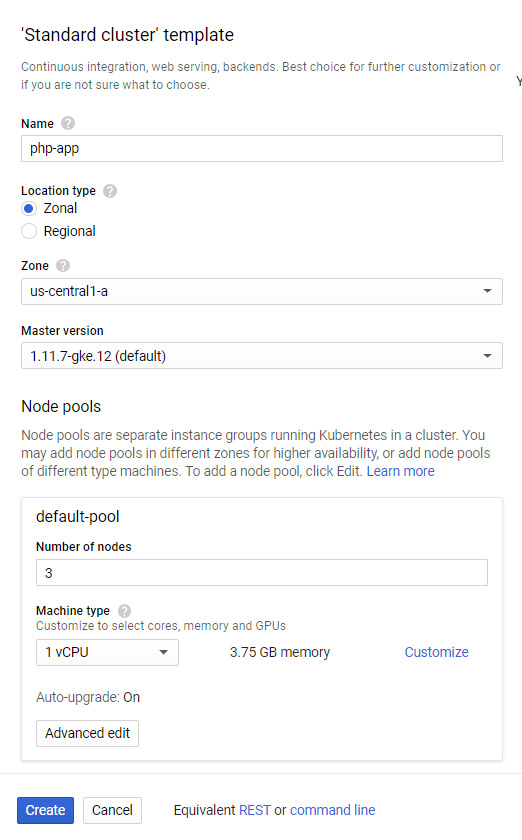
Now a new Kubernetes Cluster will get created with your defined nodes.
Once the cluster is created you can access your cluster using gcloud command or using Google Cloud Shell. Here, we will use Cloud Shell method to deploy the PHP application.
02. Connect to Kubernetes Cluster
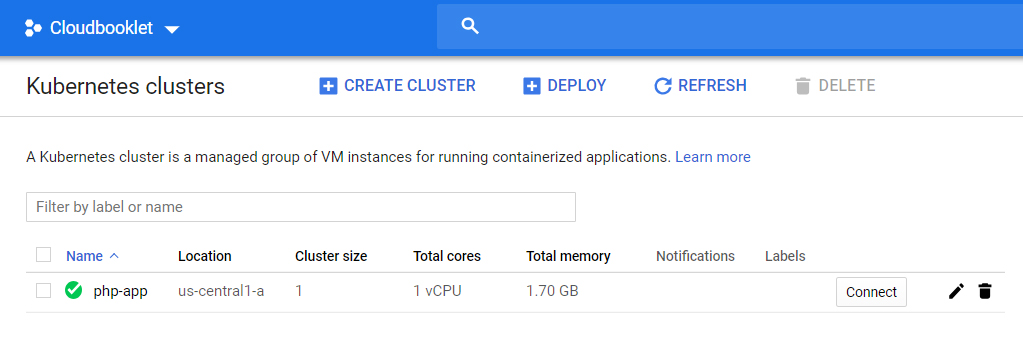
Once your cluster is created click on the connect button to connect to your cluster. Now a popup will be opened and you will get the command to run in your cloud shell.
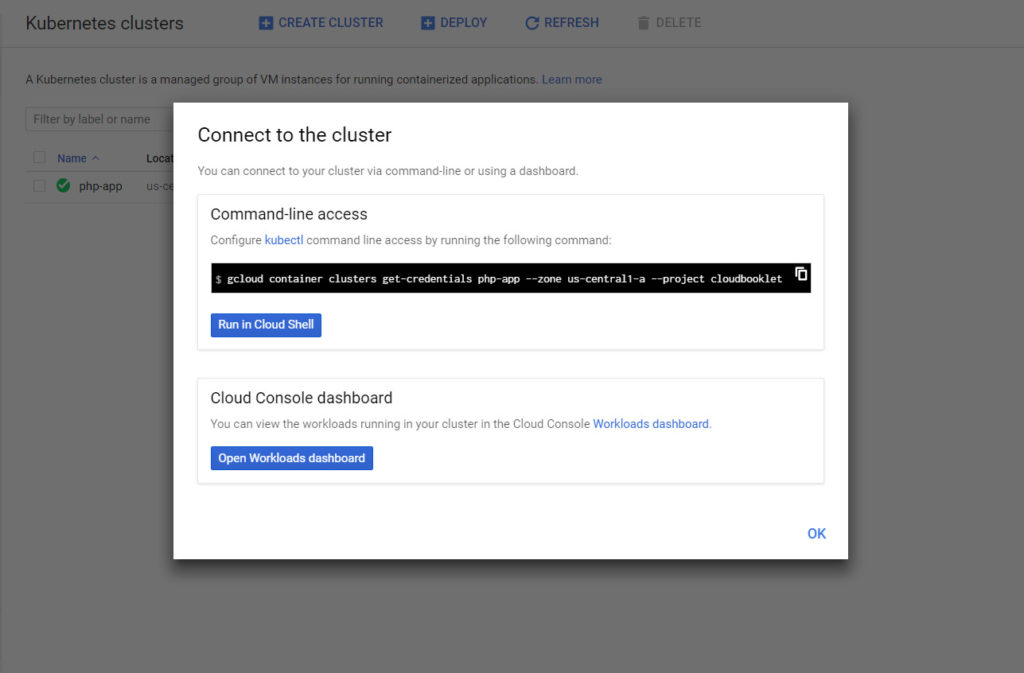
Click Run in Cloud Shell.
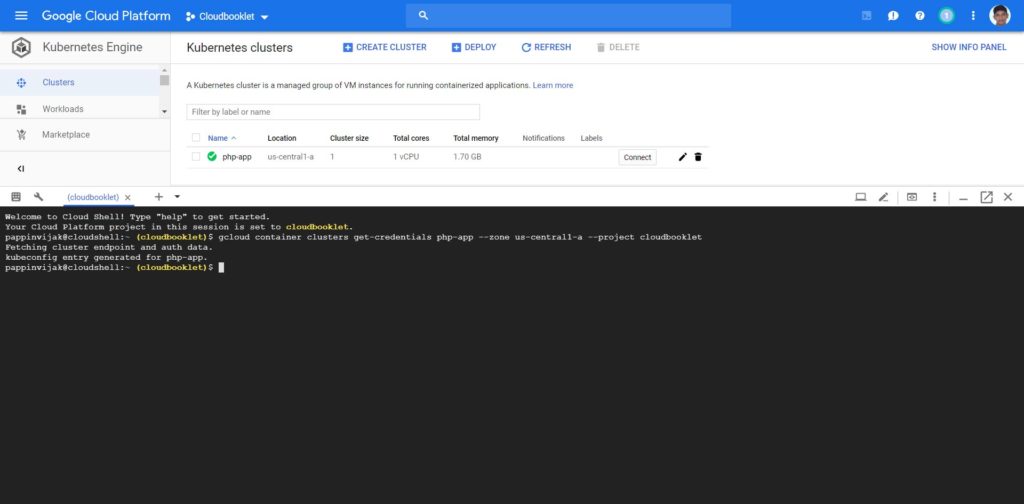
Now you are connected to your cluster and you can use the kubectl command to create services, deployments, persistent volume claims and other actions.
For example, execute the below command to get all nodes in your cluster.
kubectl get nodes
Output

NAME                                     STATUS    ROLES     AGE       VERSION
gke-php-app-default-pool-a254693a-crb8   Ready     <none>    4m        v1.11.7-gke.12
03. Create PHP-FPM Service
A service allows access to a set of pods from within the cluster. Services within a cluster can communicate directly through their names, without IP addresses. The PHP-FPM service will allow access to the PHP-FPM pods.
To create the service, you will create an object definition file which is a YAML file with some items like apiVersion, kind, metadata, spec, etc.
Create a directory for your object definitions and moce inside the directory.
mkdir php-app
cd php-app
Create a PHP-FPM service by creating a php_service.yaml file:
nano php_service.yaml
Paste the below given contents for the service.
apiVersion: v1
kind: Service
metadata:
  name: php
  labels:
    tier: backend
spec:
  selector:
    app: php
    tier: backend
  ports:
protocol: TCP
port: 9000
Here you will use port 9000 to access this service.
Now you can use the kubectl apply command to create a service.
kubectl apply -f php_service.yaml
You will get an output similar to the one below.
Output
service/php created
You can use the kubectl get command to verify the running services.
kubectl get svc
You will get all running services.
Output
NAME         TYPE           CLUSTER-IP     EXTERNAL-IP    PORT(S)        AGE
kubernetes   ClusterIP      10.23.240.1    <none>         443/TCP        2m
php          ClusterIP      10.23.248.96   <none>         9000/TCP       1m
04. Create Persistent Volume
A Persistent Volume, or PV, is block storage of a specified size that lives independently of a pod’s life cycle. Using a Persistent Volume will allow you to manage or update your pods without worrying about losing your application code. A Persistent Volume is accessed by using a PersistentVolumeClaim, or PVC, which mounts the PV at the required path.
Create a file for your persistent volume.
sudo nano dir_volume.yaml
Paste the below given contents for creating PersistentVolumeClaim.
apiVersion: v1
kind: PersistentVolumeClaim
metadata:
  name: dir
spec:
  accessModes:
    - ReadWriteOnce
  resources:
    requests:
      storage: 1Gi
Here you can define the accessModes, storage size for your volume.
Now use the kubectl apply command to create the PersistentVolumeClaim .
kubectl apply -f dir_volume.yaml
You will get an output similar to the one below.
Output
persistentvolumeclaim/dir created
You can use the kubectl get command to view your pvc.
kubectl get pv
Output
NAME                                       CAPACITY   ACCESS MODES   RECLAIM POLICY   STATUS    CLAIM         STORAGECLASS   REASON    AGE
pvc-a396fe4e-4eec-11e9-8bf5-42010a8000b0   1Gi        RWO            Delete           Bound     default/dir   standard                  4m
05. Create PHP-FPM Deployment
Deployments provide a uniform way to create, update, and manage pods by using ReplicaSets. If an update does not work as expected, a Deployment will automatically rollback its pods to a previous image.
Here you will use InitContainers to run commands which fetches an index.php file from Github using wget which simply echos the phpinfo
Create a file for your PHP-FPM deployment.
sudo nano php_deployment.yaml
Paste the below given contents for creating php deployment.
apiVersion: apps/v1
kind: Deployment
metadata:
  name: php
  labels:
    tier: backend
spec:
  replicas: 1
  selector:
    matchLabels:
      app: php
      tier: backend
  template:
    metadata:
      labels:
        app: php
        tier: backend
    spec:
      volumes:
      - name: dir
        persistentVolumeClaim:
          claimName: dir
      containers:
      - name: php
        image: php:7-fpm
        volumeMounts:
        - name: dir
          mountPath: /dir
      initContainers:
      - name: install
        image: busybox
        volumeMounts:
        - name: dir
          mountPath: /dir
        command:
        - wget
        - "-O"
        - "/dir/index.php"
        - https://raw.githubusercontent.com/videofalls/demo/master/index.php
Here you can define the template, spec, mountPath to specify the volume that you have created for your container to access.
Now use the kubectl apply command to create the deployment .
kubectl apply -f php_deployment.yaml
You will get an output similar to the one below.
Output
deployment.apps/php created
You can use the kubectl get command view the deployments.
kubectl get deployments
Output
NAME      DESIRED   CURRENT   UP-TO-DATE   AVAILABLE   AGE
php       1         1         1            1           7m
You can view the pods that this Deployment started with the following command:
kubectl get pods
It will take some time for the pods status to become podInitializing
Output
NAME                     READY     STATUS            RESTARTS   AGE
php-7894656896-jlp4l     0/1       podInitializing   0          24s
Once it’s completed you will have your pod running.
Output
NAME                     READY     STATUS     RESTARTS   AGE
php-7894656896-jlp4l     1/1       Running    0          1m
06. Create Nginx Configuration
In this step, you will use a ConfigMap to configure Nginx. A ConfigMap holds your configuration in a key-value format that you can reference in other Kubernetes object definitions.
Create a file for your Nginx CongifMap.
sudo nano nginx_configMap.yaml
Paste the below given contents for creating Nginx deployment.
apiVersion: v1
kind: ConfigMap
metadata:
  name: nginx-config
  labels:
    tier: backend
data:
  config : |
    server {
      index index.php index.html;
      error_log  /var/log/nginx/error.log;
      access_log /var/log/nginx/access.log;

      root /dir;

      location / {
          try_files $uri $uri/ /index.php?$query_string;
      }

      location ~ .php$ {
          try_files $uri =404;
          fastcgi_split_path_info ^(.+.php)(/.+)$;
          fastcgi_pass php:9000;
          fastcgi_index index.php;
          include fastcgi_params;
          fastcgi_param SCRIPT_FILENAME $document_root$fastcgi_script_name;
          fastcgi_param PATH_INFO $fastcgi_path_info;
      }
   }
You can also use your custom configuration here.
Now use the kubectl apply command to create the ConfigMap .
kubectl apply -f nginx_configMap.yaml
You will get an output similar to the one below.
Output
configmap/nginx-config created
07. Create Nginx Deployment
Next, you will specify the image to create your pod from. This tutorial will use the nginx:1.14.2 image for stability, but you can find other Nginx images on the Docker store. Also, make Nginx available on port 80
Create a file for your Nginx deployment.
sudo nano nginx_deployment.yaml
Paste the below given contents for creating Nginx deployment.
apiVersion: apps/v1
kind: Deployment
metadata:
  name: nginx
  labels:
    tier: backend
spec:
  replicas: 1
  selector:
    matchLabels:
      app: nginx
      tier: backend
  template:
    metadata:
      labels:
        app: nginx
        tier: backend
    spec:
      volumes:
      - name: dir
        persistentVolumeClaim:
          claimName: dir
      - name: config
        configMap:
          name: nginx-config
          items:
          - key: config
            path: site.conf
      containers:
      - name: nginx
        image: nginx:1.14.2
        ports:
        - containerPort: 80
        volumeMounts:
        - name: dir
          mountPath: /dir
        - name: config
          mountPath: /etc/nginx/conf.d
Nginx will automatically load any configuration files under the /etc/nginx/conf.d directory. Mounting the config volume in this directory will create the file /etc/nginx/conf.d/site.conf. So your configuration will be created with the specified configMap you created earlier.
Now use the kubectl apply command to create the deployment .
kubectl apply -f nginx_deployment.yaml
You will get an output similar to the one below.
Output
deployment.apps/nginx created
You can use the kubectl get command view the deployments.
kubectl get deployments
Output
NAME      DESIRED   CURRENT   UP-TO-DATE   AVAILABLE   AGE
nginx     1         1         1            1           6m
php       1         1         1            1           9m
You can view the pods that this Deployment started with the following command:
kubectl get pods
Output
nginx-548b4c679b-mnbj7   1/1       Running   0          5m
php-7894656896-jlp4l     1/1       Running   0          9m
08. Expose your Application
Now everything is in place and you can expose your application to internet. To do this you can run the following command to create a Load Balancer which provides you an external IP.
kubectl expose deployment nginx --port=80 --type=LoadBalancer
Now a Load Balancer will get created and you will be given an external IP address view your application on Internet.
kubectl get svc
Output
NAME         TYPE           CLUSTER-IP     EXTERNAL-IP    PORT(S)        AGE
kubernetes   ClusterIP      10.23.240.1    <none>         443/TCP        24m
nginx        LoadBalancer   10.23.246.72   <Pending>      80:31640/TCP   10s
php          ClusterIP      10.23.248.96   <none>         9000/TCP       22m
Once created you can see the Pending state of the External IP address. Re-run the command after some time to get your IP address.
Output
NAME         TYPE           CLUSTER-IP     EXTERNAL-IP    PORT(S)        AGE
kubernetes   ClusterIP      10.23.240.1    <none>         443/TCP        29m
nginx        LoadBalancer   10.23.246.72   35.202.97.54   80:31640/TCP   4m
php          ClusterIP      10.23.248.96   <none>         9000/TCP       27m
Once you have your IP address check your IP address on your browser, you will see the PHP info.
Conclusion
Now you have learned how to set up a PHPapplication with Nginx on Kubernetes Engine on Google Cloud.
Thanks for your time. If you face any problem or any feedback, please leave a comment below.
Leave a Reply
You must be logged in to post a comment.