Best Performance WordPress with Google Cloud CDN and Load Balancing. Learn how to setup your WordPress application to handle high traffic with auto-scaling capabilities on Google Cloud Platform using HTTP(S) Layer 7 Load Balancing.
In this guide you will install WordPress, configure your website to use Google Cloud Storage for media files, setup instance template, auto-scaling group to manage live traffic. You will also configure Google Cloud CDN for your website.
Prerequisites
- A running Compute Engine, see the Setting up Compute Engine Instance with Ubuntu 18.04
- Setup Google Cloud DNS for your Domain name.
- A running Cloud SQL instance, see How to set up Cloud SQL in Google Cloud
If you have all the above mentioned required requisites done and in place, you can proceed to setup Load Balancing.
Enable APIs for Load Balancing
Go to APIs and Services and click Enable APIs and Services and enable these two APIs.
- CloudSQL API
- CloudSQL Admin API
Enable Google Cloud Service account
Go to IAM & Admin >> Service accounts and click Create service account
In the Service account details enter Service account Name
Click Create
In the next step, select Role and add the following roles.
Cloud SQL >> Cloud SQL Client
Project >> Editor
Click Continue
In the next step click Create Key
Choose Key type as JSON
Click Create.
Save the downloaded Json file, we will need that later to configure WordPress to upload and serve media files from Google Cloud Storage.
Ubuntu Server Setup
SSH to the VM Instance and start by updating and upgrading the packages.
sudo apt update
sudo apt upgrade
Install Apache2 for WordPress
Install Apache2 using the following command.
sudo apt install apache2
This will install apache2 and all required dependencies.
Configure Firewall
Now you can set up Uncomplicated Firewall (UFW) with Apache to allow public access on default web ports for HTTP , HTTPS and SSH
sudo ufw app list
You will see all listed applications.
Output
Available applications:
   Apache
   Apache Full
   Apache Secure
   OpenSSH
- Apache: This profile opens port
80(normal, unencrypted web traffic) - Apache Full: This profile opens both port
80(normal, unencrypted web traffic) and port443(TLS/SSL encrypted traffic) - Apache Secure: This profile opens only port
443(TLS/SSL encrypted traffic) - OpenSSH: This profile opens port
22for SSH access.
If you are not going to use SSL you need to enable only the Apache profile.
Now we will enable Apache Full.
sudo ufw allow OpenSSH
sudo ufw allow 'Apache Full'
Enable UFW using the following command
sudo ufw enable
Install PHP 7.4 and extensions.
Add the ondrej/php which has PHP 7.4 package and other required PHP extensions.
sudo apt install software-properties-common
sudo add-apt-repository ppa:ondrej/php
sudo apt update
Once you have added the PPA you can install PHP 7.4.
sudo apt install php7.4 libapache2-mod-php7.4 php7.4-common php7.4-mysql php7.4-xml php7.4-xmlrpc php7.4-curl php7.4-gd php7.4-imagick php7.4-cli php7.4-dev php7.4-imap php7.4-mbstring php7.4-opcache php7.4-soap php7.4-zip php7.4-intl php7.4-bcmath unzip mysql-client -y
Configure PHP 7.4
Now we configure PHP for Web Applications by changing some values in php.ini file.
For PHP 7.4 with Apache the php.ini location will be in following directory.
sudo nano /etc/php/7.4/apache2/php.ini
For PHP 7.4 FPM with Nginx the php.ini location will be in following directory.
sudo nano /etc/php/7.4/fpm/php.ini
Hit F6 for search inside the editor and update the following values for better performance.
upload_max_filesize = 32M
post_max_size = 48M
memory_limit = 256M
max_execution_time = 600
max_input_vars = 3000
max_input_time = 1000
Once you have installed and confogured your PHP settings you need to restart your Apache for the changes to take effect.
sudo service apache2 restart
Configure Website Directories
Once you have installed PHP 7.3 and Apache you can proceed to setup directories.
Your website will be located in the home directory and have the following structure.
Replace yourdomainname with your original domain name without the extension.
/var/www/html/
 -- yourdomainname
 ---- public
The public directory is your website’s root directory.
Now we create these directories and set correct permissions
You need to SSH into your VM Instance and run these commands
mkdir -p /var/www/html/yourdomainname/public
sudo chmod -R 755 /var/www/html/yourdomainname
sudo chown -R www-data:www-data /var/www/html/yourdomainname
Configure Virtual Hosts for WordPress
Create a new configuration file for your website in the sites-available directory.
sudo nano /etc/apache2/sites-available/yourdomainname.conf
Copy and paste the following configuration, ensure that you change the server_name, error_log and root directives to match your domain name. Hit CTRL+X followed by Y to save the changes.
<VirtualHost *:80>
      ServerAdmin [email protected]
      ServerName www.yourdomainname.com
      ServerAlias yourdomainname.com

      DocumentRoot /var/www/html/yourdomainname/public

      <Directory /var/www/html/yourdomainname/public>
           Options Indexes FollowSymLinks
           AllowOverride All
           Require all granted
      </Directory>

      ErrorLog ${APACHE_LOG_DIR}/yourdomainname.com_error.log
      CustomLog ${APACHE_LOG_DIR}/yourdomainname.com_access.log combined
</VirtualHost>
To enable this newly created website configuration, symlink the file that you just created into the sites-enabled directory.
sudo a2ensite yourdomainname.conf
Check your configuration and restart Apache for the changes to take effect
sudo systemctl restart apache2
Download WordPress
Now that our server software is configured, we can download and set up WordPress.
It is always recommended to get the latest version of WordPress from their website.
cd /var/www/html/yourdomainname/public
curl -LO https://wordpress.org/latest.tar.gz
Once WordPress is downloaded you need to extract it using the following command.
sudo tar xzvf latest.tar.gz
Now, you can copy the entire contents of the directory into our document root.
sudo cp -a /var/www/html/yourdomainname/public/wordpress/. var/www/html/yourdomainname/public
Next cleanup your root directory by deleting the wordpress folder and the downloaded tar file.
sudo rm -r /var/www/html/yourdomainname/public/wordpress
sudo rm -f /var/www/html/yourdomainname/public/latest.tar.gz
Set correct permissions for the root folder. Don’t forget to replace the yourdomainname with your domain name you used.
sudo chmod -R 755 /var/www/html/yourdomainname
sudo chown -R www-data:www-data /var/www/html/yourdomainname
Install WordPress
Now visit your website in the browser and select the language you would like to use and click continue.
You will be prompted to enter your database, user, password, and hostname.
Enter the database name we created in Cloud SQL and the user assigned with the database with the password. Finally, enter the IP address of Cloud SQL as the hostname.
Now you can run the installation.
Once the Installation is complete we need to set the method that WordPress should use to write to the file system. Since we’ve given the web server permission to write where it needs to, we can explicitly set the file system method to “direct”. Failure to set this with our current settings would result in WordPress prompting for FTP credentials when we perform some actions like WordPress update, plugin updates, file upload, etc. This setting can be added below the database connection settings in the configuration file.
sudo nano /var/www/html/yourdomainname/public/wp-config.php
Find the line define('DB_PASSWORD', 'password'); and paste the following line below it.
define('FS_METHOD', 'direct');
Hit Ctrl+X and Y to save your configuration file.
Configure WordPress to use Cloud Storage for media files
Create a Google Cloud Storage bucket.
Go to your Google Cloud Console and navigate to Storage >> Storage and create a bucket.
Once you have created a bucket login to your WordPress dashboard and navigate to plugins and install WP Offload Media Lite.
Activate the plugin.
Go to plugin settings and choose Google Cloud Storage and choose Define key file path in wp-config.php.
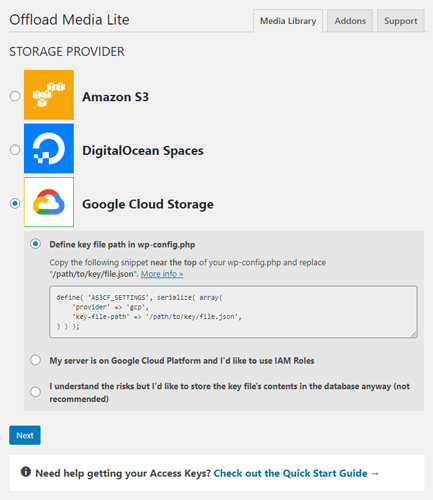
Upload the service account json file you just downloaded earlier to the webroot (/var/www/html/domainname/public).
Edit your wp-config.php and include the following.
define('AS3CF_SETTINGS', serialize(array(
     'provider' => 'gcp',
     'key-file-path' => '/var/www/html/yourdomainname/public/filename.json',
)));
Now reload the Offload Media plugin settings page, your WordPress must have connected to the Google Cloud Storage. Now you can add your bucket name and check out other options you need.
Now, this plugin copies the uploaded media to the Google Cloud Storage bucket you have configured.
Now it is time to configure WordPress for HTTP(S) Layer 7 Load Balancer.
Configure wp-config.php for Google Load Balancer
As the instances are created dynamically you need to connect to Cloud SQL using Cloud SQL proxy or with Private IP.
Open the wp-config.php file.
Using Cloud SQL proxy
Change hostname to 127.0.0.1
Using Private IP
Go to your Cloud SQL Instance and enable Private IP.
Change hostname to PRIVATE_IP_ADDRESS
While using Private IP, make sure you are using the same VPN network.
Below define('DB_COLLATE', ''); add the following.
define('FORCE_SSL_ADMIN', true);
if (strpos($_SERVER['HTTP_X_FORWARDED_PROTO'], 'https') !== false)
    $_SERVER['HTTPS']='on';
Configure HTTP to HTTPS redirect in Google Cloud Load Balancer
Open your .htaccess file and add the below directives.
sudo nano /var/www/html/yourdomainname/public/.htaccess
RewriteEngine On
RewriteCond %{HTTP:X-Forwarded-Proto} =http
RewriteRule .* https://%{HTTP:Host}%{REQUEST_URI} [L,R=permanent]
Save the file and exit the editor.
If you are using Multisite you need to add the following also to your .htaccess. This will redirect all HTTP requests to HTTPS.
RewriteEngine On
RewriteCond %{HTTPS} !=on
RewriteRule ^ https://%{HTTP_HOST}%{REQUEST_URI} [L,R=301]
Create Instance Template
Next, stop the VM Instance and go to Compute Engine >> Images and click Create Image.
In Name enter a unique name
In Source select Disk
In Source Disk select the disk of your VM Instance
Click Create.
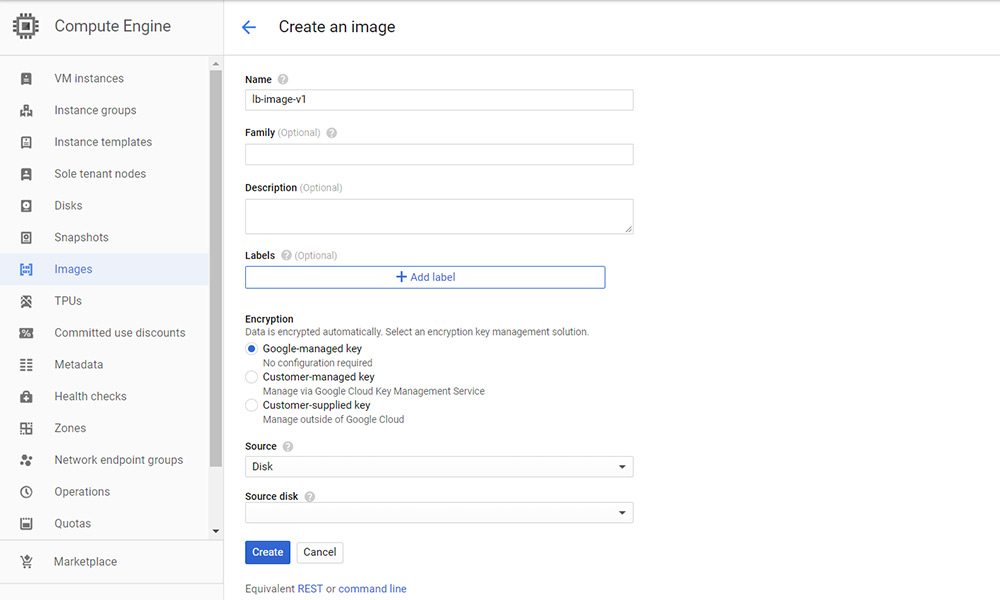
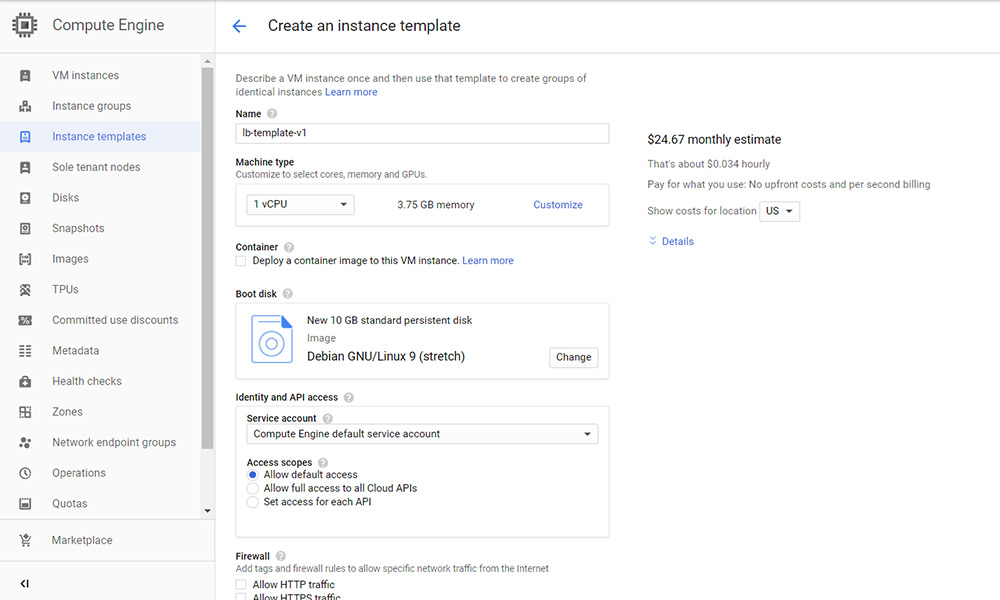
Once the Image is created go to Compute Engine >> Instance templates and click Create instance template.
In Name enter name of the template.
In Machine type choose 1 vCPU 3.75 GB RAM
In the Boot Disk click Change and click the Custom images tab.
Choose the Image that you created earlier.
In the Boot disk type select SSD persistent disk
Click Select.
In Identity and API access choose Allow full access to all Cloud APIs
In Firewall check both Allow HTTP traffic and Allow HTTPS traffic
Cloud SQL Proxy connection
If you are using the Private IP address to connect to Cloud SQL, you can skip the startup script.
In the Management tab find the Startup script and enter the following.
#! /bin/bash
sudo apt update
wget https://dl.google.com/cloudsql/cloud_sql_proxy.linux.amd64 -O cloud_sql_proxy
chmod +x cloud_sql_proxy
sudo mkdir /cloudsql; sudo chmod 777 /cloudsql
./cloud_sql_proxy -instances=INSTANCE_CONNECTION_NAME=tcp:3306
Replace the INSTANCE_CONNECTION_NAME with your Cloud SQL connection name
In the Networking tab make sure Premium is selected in Network Service Tier.
Click Create.
Create a Managed Instance Group
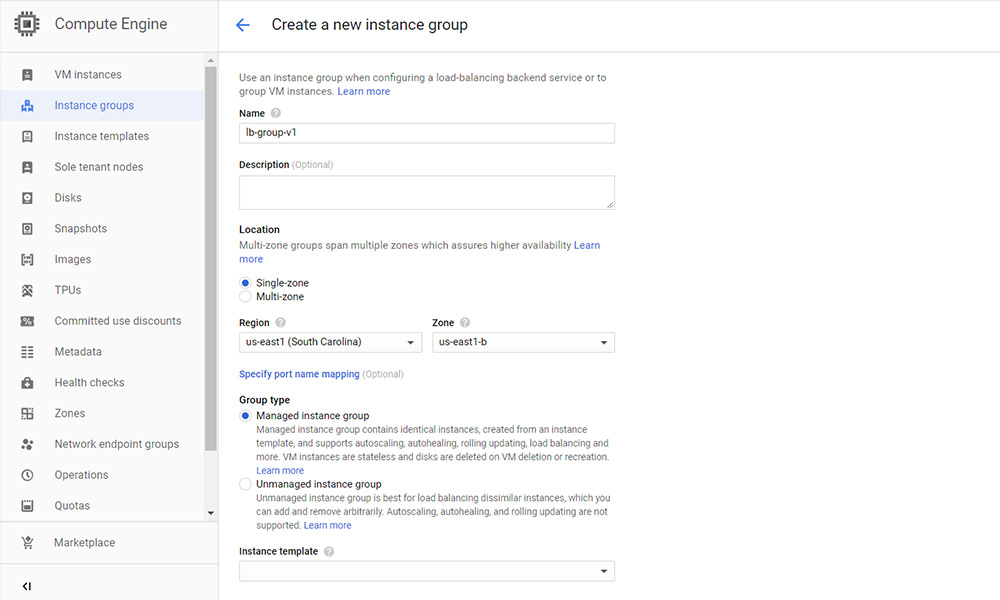
Goto Compute Engine >> Instance groups and click Create instance group.
In Name enter name
In Location choose Single-zone
In Region choose your preferred region.
Click Specify port name mapping.
In Port name enter http and in Port numbers enter 80
In Group type choose Managed instance group
In Instance template select the instance template you just created.
Leave everything to default and click Create.
Reserve Global Region IPv4 and IPv6 Address
Go to VPC network >> External IP addresses and click Reserve Static IP Address.
In Name enter a name for IPv4 address.
In Network Service Tier choose Premium
In IP version choose IPv4
In Type choose Global
Click Reserve.
Again click Reserve Static IP Address.
In Name enter a name for IPv6 address.
In Network Service Tier choose Premium
In IP version choose IPv6
In Type choose Global
Click Reserve.
Create Load Balancer
Go to Network Services >> Load Balancing and Click Create Load Balancer.
In the HTTP(S) Load Balancing click Start Configuration.
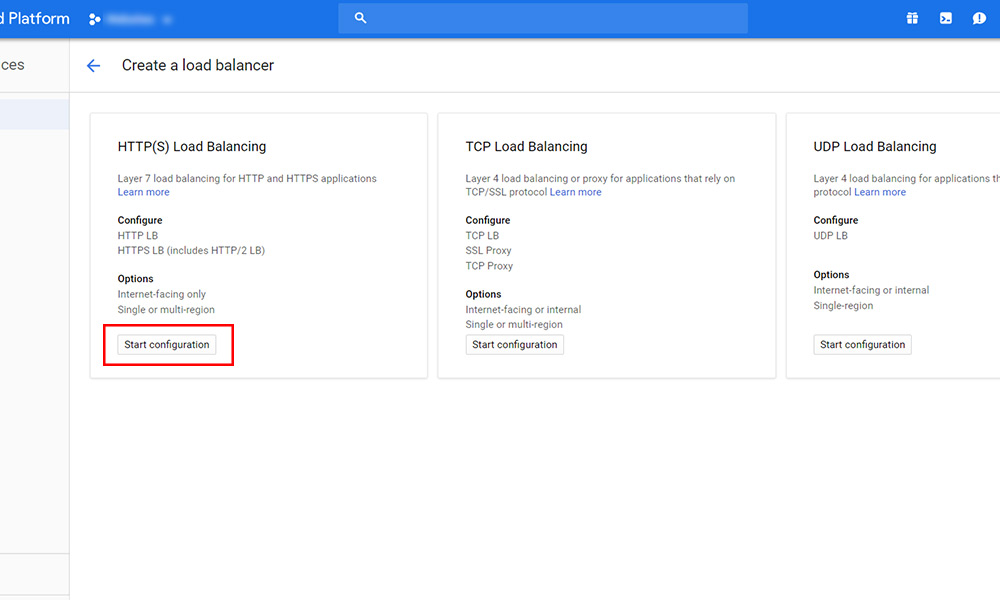
Backend configuration
Enter a name for your Load Balancer and click Backend configuration.
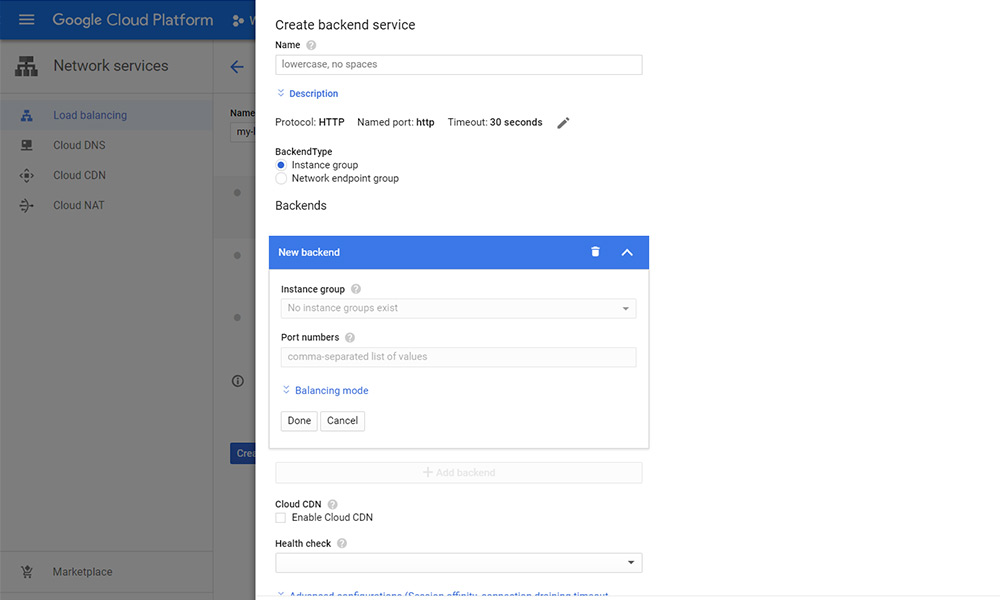
In Backend services & backend buckets select Backend service >> Create backend service
Enter a name for your backend service.
In Backend Type choose Instance group
In Backends select the Instance group you created.
In Port numbers enter 80
In Balance mode choose Utilization
Click Done.
Check Enable Cloud CDN.
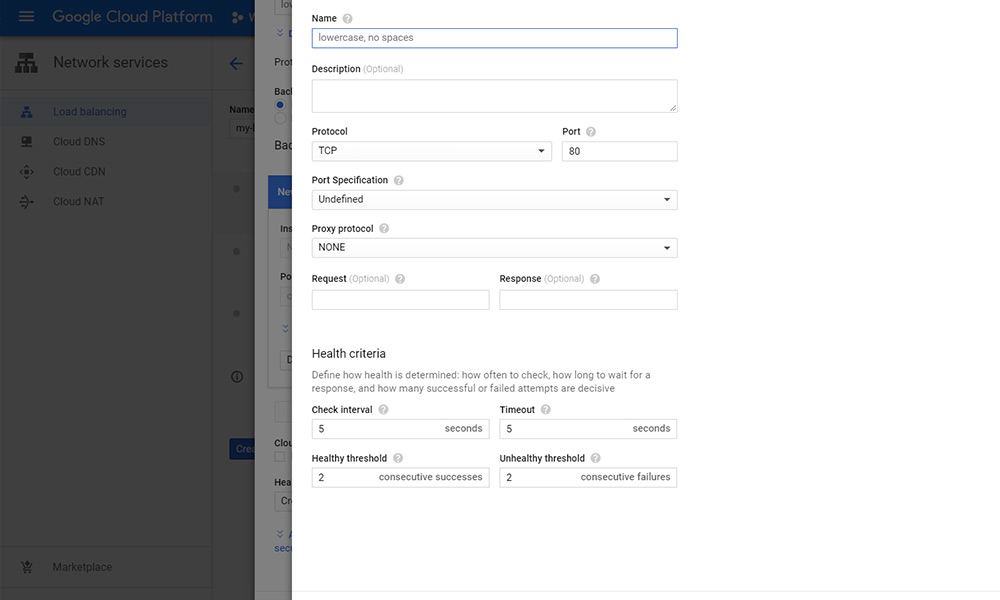
Create Health Check
In Health Check click create health check
In Name enter a health check name
In Protocol select TCP
In Port enter 80
In Proxy protocol select None
In Check Interval enter 10
In Timeout enter 5
In Healthy threshold enter 2
In Unhealthy threshold enter 3
Click Save and Continue.
Host and Path Rules
Here you can setup redirections to www or non-www urls with or without HTTPS. This helps you to prevent any canonical URL issues.
In the Host and path rules section choose Advanced host and path rule (URL redirect, URL rewrite)
In the Action choose Route traffic to a single backend.
In the Backend select the backend you just created above.
Click Done.
Click Add host and path rule.
In the Hosts add your domain name with and without www.
In Path rules (paths and actions) click edit.
In the Action choose Redirect the client to different host/path.
In the Host redirect enter the domain name with or without www for redirection.
In the Path redirect choose Prefix redirect
Check HTTPS redirect Enable.
Click Save.
Frontend Configuration
Enter a name for your IPv4 frontend configuration.
In Protocol select HTTPS
In IP version select IPv4
In IP address select the IP4 address you reserved.
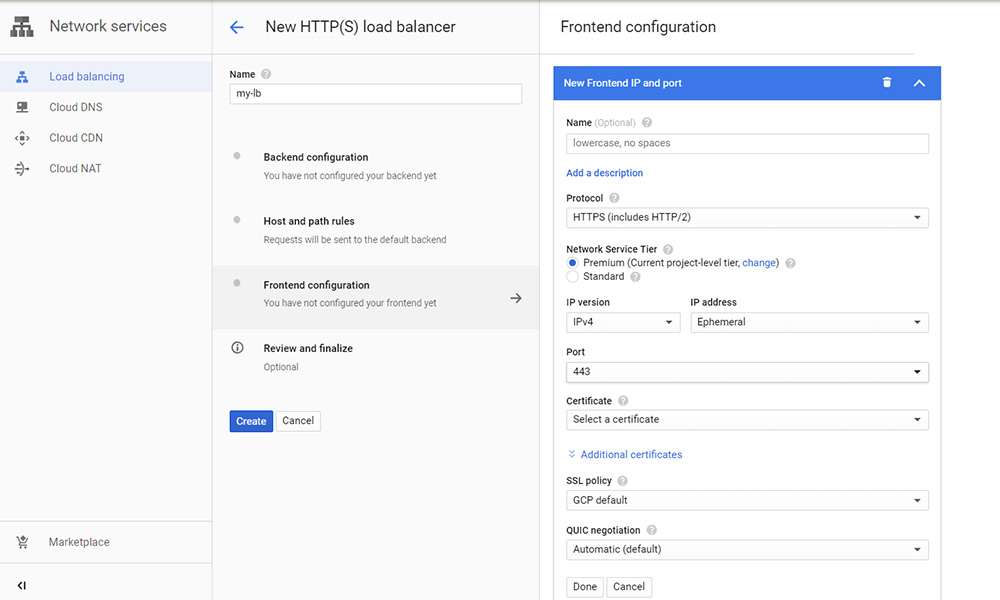
In Certificate select Create Certificate.
Enter a name for your certificate.
In Create mode choose to Create Google-managed certificate
In Domains enter *.yourdomainname.com
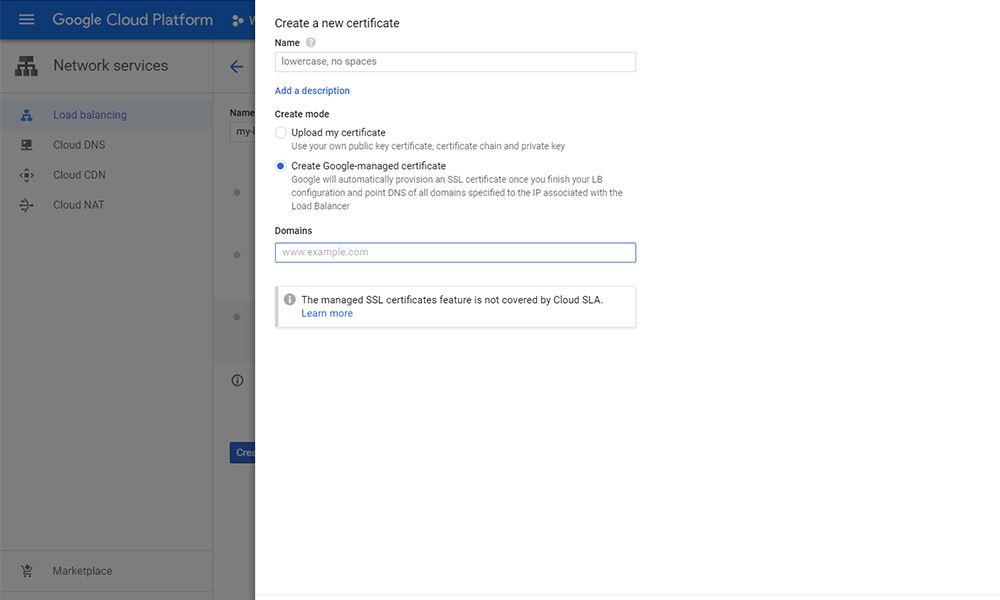
This setting will issue a Google managed Let’sEncrypt Certificate.
Attention: Once you have created a certificate it will be in the PROVISION status. Once the certificate is ACTIVE, you’ll have SSL issues for a few minutes with the error message ERR_SSL_VERSION_OR_CIPHER_MISMATCH. It took 15 minutes for mine to have everything up and running.
Now in Frontend configuration click Done.
Click Add Frontend IP and Port.
Enter a name for your IPv6 frontend configuration.
In Protocol select HTTPS
In IP version select IPv6
In IP address select the IPv6 address you reserved.
In Certificate select the certificate you just created.
Click Done.
That’s all now your Backend and Frontend are configured.
Enable Autohealing
Once the load balancer is configured, you need to go back to your instance group and edit the instance group.
In the Autohealing section select the health check you have created while setting up the load balancer.
Click Save.
Configure DNS and Setup Cloud CDN
Click Create.
Now Goto Network services >> Cloud DNS and click your domain name.
Edit the A record and replace the IPv4 address with your newly reserved IPv4 address.
Click Add record set.
In Resource record type select AAAA record.
Enter the IPv6 address that you reserved.
Goto Goto Network services >> Cloud CDN and click Add origin.
In Origin select the Load balancer you just created.
Click Add.
Now go to Network services >> Load Balancing and wait for 10 – 15 minutes for the Load Balancing settings to propagate. Once done you will see a green check mark which indicates everything is fine.
Get your Professional Google Cloud Architect certificate with this easy to learn course now.
Conclusion
Now you have learned how to setup WordPress with high availability on Google Cloud with HTTP(S) Layer 7 load balancer by auto-scaling the instances during traffic.
Thanks for your time. If you face any problem or any feedback, please leave a comment below.
Leave a Reply
You must be logged in to post a comment.