Measurements of electrical quantities
here again with another responsible post on technology aspect again (Measurement of electrical quantities on a computer system). Here are some briefly explanation or briefly explained step’s on how to Measure a electrical quantities on a computer system. So let sit back and watch, sit well and read/study the step gradually carefully, hope we should be able to achieve from our(alitech) article .
here again with another responsible post on technology aspect again (Measurement of electrical quantities on a computer system). Here are some briefly explanation or briefly explained step’s on how to Measure a electrical quantities on a computer system. So let sit back and watch, sit well and read/study the step gradually carefully, hope we should be able to achieve from our(alitech) article .
Also like to check out: HOW TO ASSEMBLING AND DISASSEMBLING A COMPUTER SYSTEM
…
How to know the Measurements of electrical quantities on a computer system
OBJECTIVES
1. Measure Resistance on a speaker
2. Measure Voltage from a power supply
RESOURCES
1. PC desktop/tower Computer System
2.Digital Multimeter with Lead
3. A good fuse 4. A bad fuse
DISCUSSION(Measurements of electrical quantities on a computer system.)
Here you will measure various electrical quantities on a computer. The Multimeter can be used to measure resistance, current and potential across a circuit Procedure
4. Resistance on a speaker (Measurements of electrical quantities on a computer system.)
(f) Open the inside of the PC
(g) Rotate the Multimeter dial to 200 ohms
(h) Hold the Red lead on the exposed end of the Red wire that connect the systems’ speaker
(i) Hold the Black lead on the exposed end of the Black wire that connect the systems’ speaker
(i) Hold the Black lead on the exposed end of the Black wire that connect the systems’ speaker
(j) Record the reading of the meter in Table 2-1 5.5. Voltage (f) Turn on the power of the PC
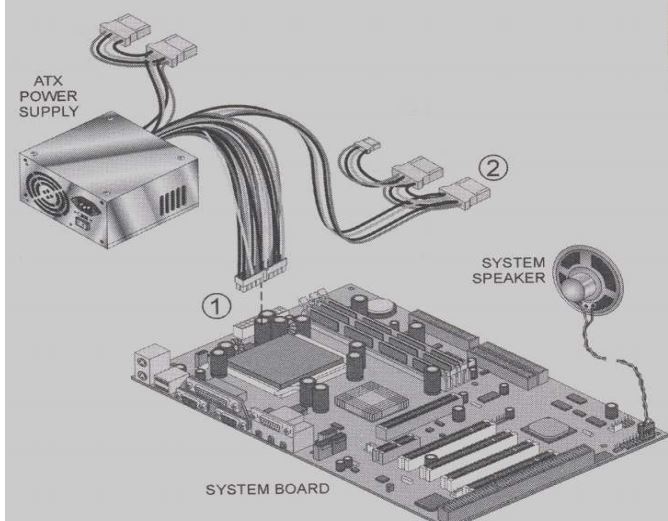
(g) Look for the 20-pin ATX power connector that in plugged into the motherboard. It should look like the location 1 in
(h) Rotate the Multimeter dial to 20 Vdc
(i)Firmly secure the black connector to the Multimeter into a black connector of the 4-pin internal drive power connector as in location 2
(j) Insert the Red Multimeter connector into each pin on the ATX connector and record their various voltages in Table 2-2
(j) Insert the Red Multimeter connector into each pin on the ATX connector and record their various voltages in Table 2-2
NOTE: the pin number is small and may be labeled on the back wire of the
connector. The yellow wire should be one
(f) Check the voltage at each pin of the 4-pin internal drive power connector and record the . Values in Tables 2-3
(e) Turn off the PC
(f) Replace the side panel
6. Fuses(Measurements of electrical quantities on a computer system.)
(k) Obtain the two fuses; one good and one bad
(l) Rotate the Multimeter dial to 200 ohms
(m)Touch the two leads together and record the Multimeter reading in Table 2-4. You now establishing a datum or zero point of no resistance
(n) Without touching the leads together, record the Multimeter reading in Table 2-5
(o) Place one lead on one and of the good fuse.
(p) Place the other lead on the other end of the good fuse. Make sure that your finger or the leads are not touching each other
NOTE: The only path for electricity to flow is through the fuse
(q) Record the Multimeter reading in Table 2-6
(r) Place one lead on one and of the bad fuse
(s) Place the other lead on the other end of the bad fuse. Make sure that your finger or the leads are not touching each other
NOTE: The only path for electricity to flow is through the fuse
(t) Record the Multimeter reading in Table 2-7
#Measurements of electrical quantities on a computer system.
stay tune for the rest post we get back to you and also visit for latest school news.


Leave a Reply
You must be logged in to post a comment.