How to Install Jenkins on Ubuntu 20.04 with Nginx and SSL. Jenkins is a Java based software which can be installed from the Ubuntu packages. Jenkins is mainly used for Continues Integration and Continuous Deployment (CI CD).
In this tutorial you are going to learn how to install Jenkins and configure Nginx as a reverse proxy to Jenkins and install free Let’s Encrypt SSL on Ubuntu 20.04.
This setup is tested on Google Cloud and it will run the same on any cloud services like AWS or Azure or any VPS or Dedicated servers running Ubuntu 20.04.
Prerequisites
- Running Compute Engine, see the Setting up Compute Engine Instance with Ubuntu 20.04.
- Install Oracle Java 11 by following the guidelines to install Java on Ubuntu 20.04.
- DNS setup with the steps listed in Setting up Google Cloud DNS for your domain.
Once you have all the prerequisites completed you can proceed to install Jenkins.
Install Jenkins
To install the latest version of Jenkins you need to first add the repository key to the system.
wget -q -O - https://pkg.jenkins.io/debian-stable/jenkins.io.key | sudo apt-key add -
Next, add the repository address to the sources list.
sudo sh -c 'echo deb http://pkg.jenkins.io/debian-stable binary/ > /etc/apt/sources.list.d/jenkins.list'
Now you can update the packages to use the added new repository and install Jenkins.
sudo apt update
sudo apt install jenkins
Once the installation is complete you can start Jenkins using the following command.
sudo service jenkins start
To verify the status you can use the following command.
sudo service jenkins status
Output
● jenkins.service - LSB: Start Jenkins at boot time
     Loaded: loaded (/etc/init.d/jenkins; generated)
     Active: active (exited) since Thu 2020-07-07 15:45:37 UTC; 42s ago
       Docs: man:systemd-sysv-generator(8)
      Tasks: 0 (limit: 1997)
     CGroup: /system.slice/jenkins.service
This output states that Jenkins is running successfully.
Install Nginx
Install Nginx with the following command.
sudo apt install nginx
This command will install Nginx on your VM instance.
Setup Firewall
Once Nginx is installed you can configure firewall, Nginx registers itself with ufw. So, you can allow the necessary ports and enable ufw.
sudo ufw allow OpenSSH
sudo ufw allow 'Nginx Full'
Make sure you have added rules for SSH port 22, if you haven’t done this you cannot access the SSH. Once you have verified you can enable UFW.
sudo ufw enable
Configure Nginx for Jenkins
Now it’s time to configure Nginx as a reverse proxy for Jenkins on a subdomain.
Remove the default Nginx configuration.
sudo rm -rf /etc/nginx/sites-available/default
sudo rm -rf /etc/nginx/sites-enabled/default
Create a new configuration for Jenkins
sudo nano /etc/nginx/sites-available/jenkins.yourdomainname.com
Configuration for Jenkins on Subdomain
 server {
    listen [::]:80;
    listen 80;

    server_name jenkins.yourdomainname.com;

    location / {
        proxy_set_header        Host $host:$server_port;
        proxy_set_header        X-Real-IP $remote_addr;
        proxy_set_header        X-Forwarded-For $proxy_add_x_forwarded_for;
        proxy_set_header        X-Forwarded-Proto $scheme;

        proxy_pass          http://127.0.0.1:8080;
        proxy_read_timeout  90;

        proxy_redirect      http://127.0.0.1:8080 https://jenkins.yourdomainname.com;

        proxy_http_version 1.1;
        proxy_request_buffering off;
        add_header 'X-SSH-Endpoint' 'jenkins.yourdomainname.com:50022' always;
    }
}
Paste this new configuration setting and hit Ctrl+X followed by Y to save the file.
Configuration for Jenkins on Sub-directory
Paste this new configuration setting and hit Ctrl+X followed by Y to save the file.
 server {
    listen [::]:80;
    listen 80;

    server_name yourdomainname.com;

    location ^~ /jenkins/ {
        proxy_pass http://127.0.0.1:8080/jenkins/;
        sendfile off;

        proxy_set_header   Host             $host:$server_port;
        proxy_set_header   X-Real-IP        $remote_addr;
        proxy_set_header   X-Forwarded-For  $proxy_add_x_forwarded_for;
        proxy_max_temp_file_size 0;

        client_max_body_size       10m;
        client_body_buffer_size    128k;

        proxy_connect_timeout      90;
        proxy_send_timeout         90;
        proxy_read_timeout         90;
        proxy_temp_file_write_size 64k;

        proxy_http_version 1.1;
        proxy_request_buffering off;
        proxy_buffering off;
    }
}
Hit Ctrl + X followed by Y and Enter to save and exit the file.
Enable the configuration.
sudo ln -s /etc/nginx/sites-available/jenkins.yourdomainname.conf /etc/nginx/sites-enabled/jenkins.yourdomainname.conf
Configure Jenkins for Nginx
In order to Jenkins work with Nignx you need to make Jenkins to listen on localhost
sudo nano /etc/default/jenkins
Find the JENKINS_ARGS line and add --httpListenAddress=127.0.0.1 to the existing arguments.
So, the line will look similar to the one below.
JENKINS_ARGS="--webroot=/var/cache/$NAME/war --httpPort=$HTTP_PORT --httpListenAddress=127.0.0.1"
For sub-directory configuration you need to add additional argument with the directory name with --prefix
JENKINS_ARGS="--webroot=/var/cache/$NAME/war --httpPort=$HTTP_PORT --httpListenAddress=127.0.0.1 --prefix=/jenkins"
Save and exit the file. Finally restart Jenkins.
sudo systemctl restart jenkins
Check the configuration and restart Nginx.
sudo nginx -t
sudo service nginx restart
Now Nginx is setup as a reverse proxy for Jenkins.
Install Free Let’s Encrypt SSL Certificate
HTTPS
HTTPS is a protocol for secure communication between a server (instance) and a client (web browser). Due to the introduction of Let’s Encrypt, which provides free SSL certificates, HTTPS are adopted by everyone and also provides trust to your audiences.
sudo apt-get install python3-certbot-nginx
Now we have installed Certbot by Let’s Encrypt for Ubuntu 20.04, run this command to receive your certificates.
sudo certbot --nginx certonly
Enter your email and agree to the terms and conditions, then you will receive the list of domains you need to generate SSL certificate.
To select all domains simply hit Enter
The Certbot client will automatically generate the new certificate for your domain. Now we need to update the Nginx config.
Configure SSL
Once the SSL is installed, you can configure it in your Nginx file.
sudo nano /etc/nginx/sites-available/yourdomainname.com
server {
     listen [::]:80;
     listen 80;

     server_name jenkins.yourdomainname.com;

     return 301 https://jenkins.yourdomainname.com$request_uri;
 }

 server {
     listen [::]:443 ssl;
     listen 443 ssl;

     server_name jenkins.yourdomainname.com;

     ssl_certificate /etc/letsencrypt/live/jenkins.yourdomainname.com/fullchain.pem;
     ssl_certificate_key /etc/letsencrypt/live/jenkins.yourdomainname.com/privkey.pem;

     location / {
         proxy_set_header        Host $host:$server_port;
         proxy_set_header        X-Real-IP $remote_addr;
         proxy_set_header        X-Forwarded-For $proxy_add_x_forwarded_for;
         proxy_set_header        X-Forwarded-Proto $scheme;
         proxy_pass          http://127.0.0.1:8080;
         proxy_read_timeout  90;
         proxy_redirect      http://127.0.0.1:8080 https://jenkins.yourdomainname.com;

         proxy_http_version 1.1;
         proxy_request_buffering off;
         add_header 'X-SSH-Endpoint' 'jenkins.yourdomainname.com:50022' always;
     }
 }
Hit CTRL+X followed by Y to save the changes.
Check your configuration and restart Nginx for the changes to take effect.
sudo nginx -t
sudo service nginx restart
Renewing SSL Certificate
Certificates provided by Let’s Encrypt are valid for 90 days only, so you need to renew them often. Now you set up a cronjob to check for the certificate which is due to expire in next 30 days and renew it automatically.
sudo crontab -e
Add this line at the end of the file
0 0,12 * * * certbot renew >/dev/null 2>&1
Hit CTRL+X followed by Y to save the changes.
This cronjob will attempt to check for renewing the certificate twice daily.
That’s all now you can visit your domain name in your web browser. You can see your Jenkins setup page with HTTPS.
Set Up Jenkins
Now you can visit your domain name yo setup Jenkins.
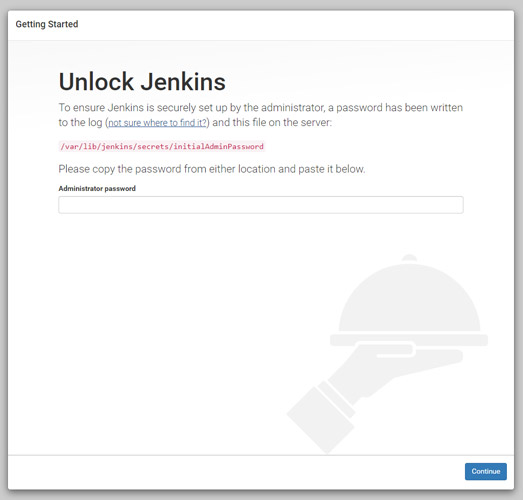
You will see the Unlock screen where you need to type the password to unlock Jenkins.

Execute the following command to get the password.
sudo cat /var/lib/jenkins/secrets/initialAdminPassword
Copy the password and paste it in the Administrator password field to unlock and start the setup.

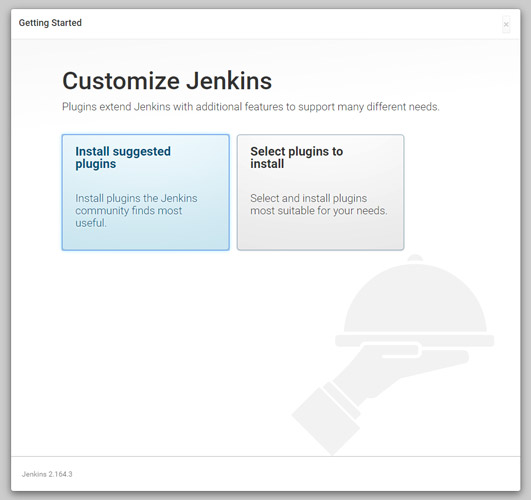
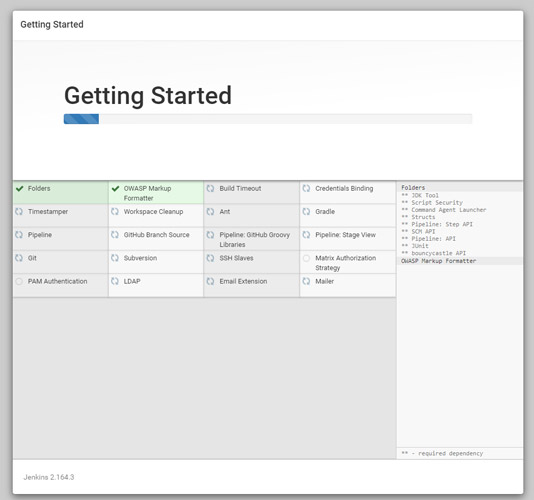
Click Install suggested plugins option to start the installation immediately.

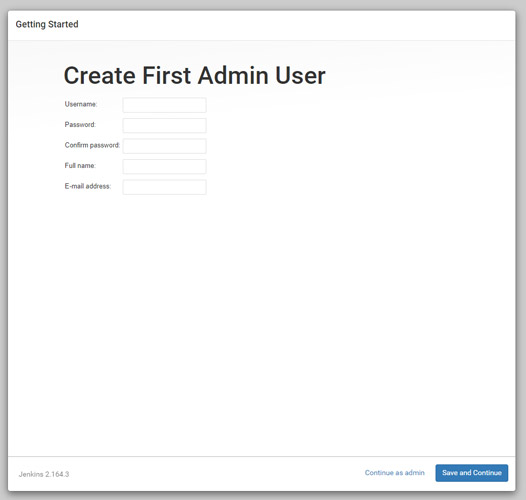
Once the installation is complete you can create an admin user to login to the dashboard.

Finally you will see the Instance Configuration, you can use your domain name or IP address.
Click Save and Finish.
Once everything is complete click Start using Jenkins to visit the main Jenkins dashboard.
Gain a skill set to cultivate a Continuous Integration and Continuous Deployment capability now
Conclusion
In this tutorial you have learned how to install Jenkins and configure Nginx as a reverse proxy, and secured it with free Let’s Encrypt SSL.
Thanks for your time. If you face any problem or any feedback, please leave a comment below.
Leave a Reply
You must be logged in to post a comment.