Auto GPT is a self-contained GPT-4 agent. Auto GPT is essentially ChatGPT conversing with itself. It can write code, run programs, and connect to the internet. ChatGPT can validate sources, generate programs, and debug programs all on its own by chatting to itself. It’s the newest big thing in artificial intelligence. In this tutorial, I’ll walk you through running Auto GPT with Docker step by step.
Learn how to download Auto GPT and install in Windows
Learn how to download Auto GPT and install in Linux
Table of Contents
What is Auto GPT?
Auto-GPT is a game-changing open-source Python program that uses the power of GPT-4 to develop self-prompting AI agents capable of doing a variety of online activities. This autonomous AI experiment is unusual in that it allows the AI to act without human urging and divides the AI’s steps into “thoughts,” “reasoning,” and “criticism,” allowing the user to understand exactly what the AI is doing and why.
Auto-GPT may access a wide range of data sources, such as social media activity, financial data, customer behavior, and market trends. It can analyze and interpret written and spoken language, and it can improve its performance over time by learning from its own experiences and comments. Auto-GPT, on the other hand, is not a finished application or solution and may underperform in complicated real-world business settings.
Features of AutoGPT
- If Docker is not already installed, it will be installed immediately.
- Requests API keys and workspace folder paths.
- The Auto-GPT repository is cloned, and the environment is configured.
- Docker containers are used to construct and operate the application.
Steps to Install Auto GPT using Docker
I’m assuming you’re familiar with the terminal, First make sure to Install docker and Git to install Auto GPT.
Installation: You can also refer our article how to install AutoGPT in windows and Linux
Step:1 Open your terminal
Step:2 Clone the Auto GPT git repository
The following command creates an Auto-GPT folder in the folder you selected in your terminal.
git clone https://github.com/Significant-Gravitas/Auto-GPT.git Auto-GPTStep:3 Examine the stable Branch
Auto GPT is currently in active development. The master branch is frequently in a broken state. If you only wish to utilize Auto GPT, you must checkout the stable branch. This branch contains the most recent stable release of Auto GPT.
cd ./Auto-GPT #move to the newly created folder
git fetch
git checkout stable
Step:4 Create an .env File
cp .env.template .envStep:5 Get an OpenAI API key
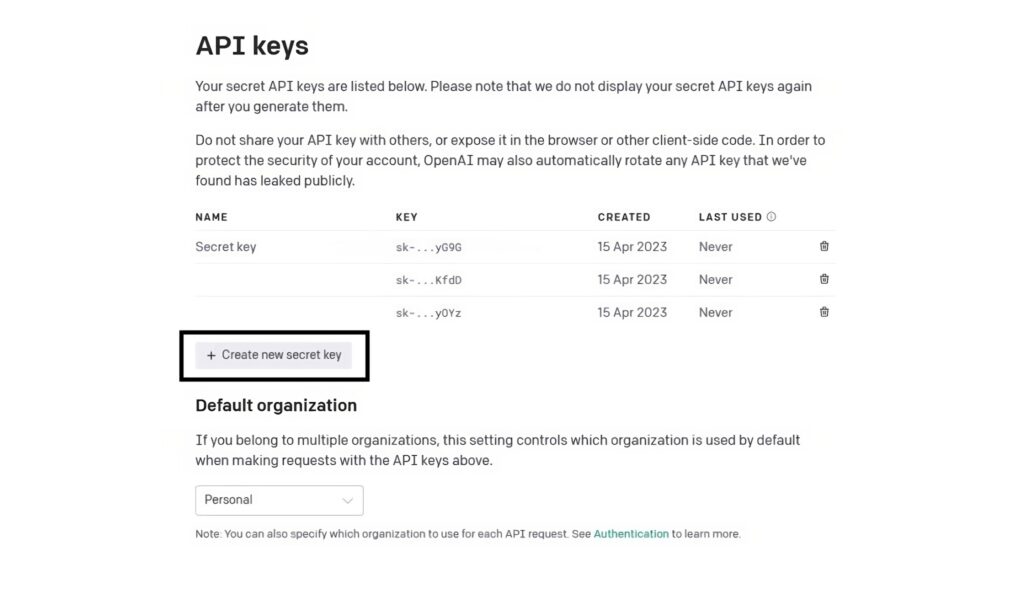
To generate your OpenAI API keys, go to your OpenAI account settings. Take the following steps:

- Log in to your OpenAI account at https://platform.openai.com/.
- Click on your profile image located in the upper-right corner of the page.
- In the dropdown menu that appears, click on “Settings”.
- Choose “API keys” from the menu on the left-hand side of the page.
- Click the “Create new secret key” button to generate a new API key.
- Give the API key a name that you will remember and press the “Create” button.
- The API key will be generated, and you will not be able to access the whole key again, so make a note of it and keep it safe.
- To remove an API key, click the “Delete” button next to the key you wish to delete and confirm the action in the pop-up box.
It is important to note that removing an API key is irreversible, and you will not be able to recover it.
Step:6 Save the key in the .env file
Navigate to the Auto-GPT directory and double-click the.env file. Paste your API key where it says OPEN_API_KEY=.
OPENAI_API_KEY=#copy and paste your API key hereStart Docker
Step:7 Run Auto-GPT with docker-compose
In your terminal, type the following command.
docker-compose run --build --rm auto-gptStep:8 Run Auto GPT in continuous mode
docker-compose run --build --rm auto-gpt --continuousThat’s it! You have successfully downloaded and installed Auto GPT on Docker.
This article is to help readers gain a better understanding of how to download Auto GPT on Docker. We trust that it has been helpful to you. Please feel free to share your thoughts and feedback in the comment section below.
Leave a Reply
You must be logged in to post a comment.