Learn how to – How To Create Internal Network in Xen | XCP-ng.
In Xen|XCP-ng Virtualization Infrastructure each managed server has one or more networks. A network is basically a virtual Ethernet switch that can be connected to an external interface (with or without a VLAN tag). It can also be entirely virtual, internal to an individual server or pool compute resources.
When you install XenServer or XCP-ng on a physical server, a network is created for each physical NIC on the server. The network works as a bridge between a virtual network interface on a Virtual Machine (VIF) and a physical network interface (PIF) associated with a network interface card (NIC) on the host server.
Create Private/Internal Network in Xen | XCP-ng
You may need to add a new network that’s internal network for your internal applications communication. You have the flexibility of configuring up to 16 networks per managed server. This operation can be performed on XenCenter or Xen Orchestra web console. Choose the solution you have in your Infrastructure to create an private internal network in Xen | XCP-ng.
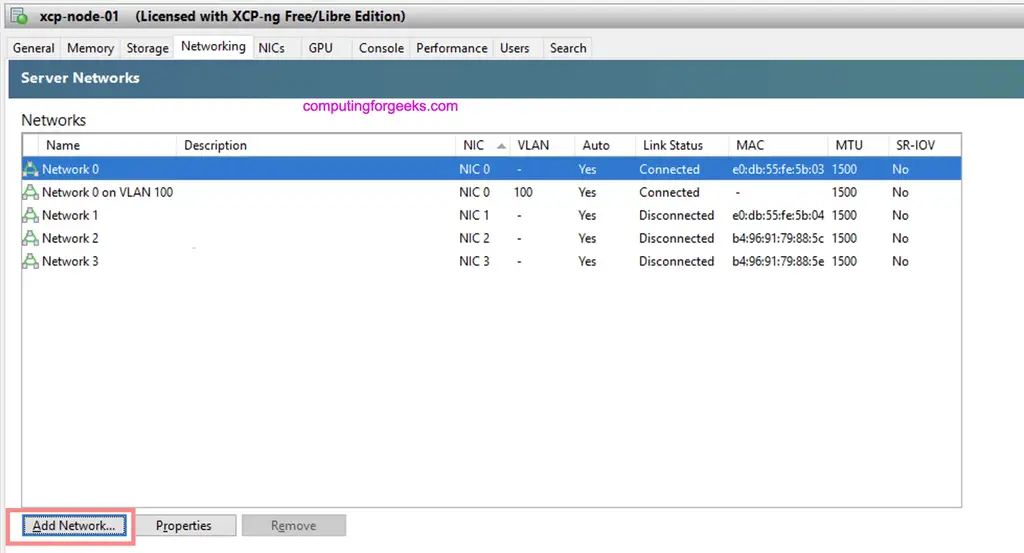
Under “Networking” tab click on “Add Network“

For single server setup choose “Single-Server Private Network“. If you have a pool with a number of servers then use “Cross-Server Private Network“.

Give the network a name and description.

Choose if you want to automatically add the network to new instances created on Xen / XCP-ng.

Add Internal Network Created to VM
Once the network has been created you can add it to a Virtual Machine. Click on the instance name and choose “Add interface” under “Networking” section.

Select the network to be added to Virtual Machine and use MAC address automatic generation option.

Configure IP Address on the VM
Login to the instance and confirm interface is visible.
$ ip link
1: lo: <LOOPBACK,UP,LOWER_UP> mtu 65536 qdisc noqueue state UNKNOWN mode DEFAULT group default qlen 1000
    link/loopback 00:00:00:00:00:00 brd 00:00:00:00:00:00
3: eth1: <BROADCAST,MULTICAST,UP,LOWER_UP> mtu 1500 qdisc mq state UP mode DEFAULT group default qlen 1000
    link/ether 76:4e:3d:fe:26:57 brd ff:ff:ff:ff:ff:ff
6: eth0: <BROADCAST,MULTICAST,UP,LOWER_UP> mtu 1500 qdisc mq state UP mode DEFAULT group default qlen 1000
    link/ether b2:b9:f9:8c:50:f7 brd ff:ff:ff:ff:ff:ff
Configure the IP Address. You’ll fill your Subnet and IP address information.
Ubuntu / Debian Systems
Editing the /etc/network/interfaces file:
$ sudo vim /etc/network/interfaces
# Private network
auto eth0
iface eth0 inet static
        address  10.10.10.2
        netmask  255.255.255.0
Using netplan:
#Example
$ sudo vim /etc/netplan/00-installer-config.yaml
network:
  ethernets:
    # interface name
    eth0:
      dhcp4: no
      addresses: [10.10.10.2/24]

#Apply configuration
$ sudo netplan apply
Validate IP configurations:
$ ip addr show dev eth0
6: eth0: <BROADCAST,MULTICAST,UP,LOWER_UP> mtu 1500 qdisc mq state UP group default qlen 1000
    link/ether b2:b9:f9:8c:50:f7 brd ff:ff:ff:ff:ff:ff
    inet 10.10.10.2/24 brd 10.10.10.255 scope global eth0
       valid_lft forever preferred_lft forever
    inet6 fe80::b0b9:f9ff:fe8c:50f7/64 scope link
       valid_lft forever preferred_lft forever
CentOS / RHEL System
I’ll configure my Second server which is CentOS 8:
$ sudo vim /etc/sysconfig/network-scripts/ifcfg-eth0
TYPE=Ethernet
BOOTPROTO=static
NAME=eth0
DEVICE=eth0
ONBOOT=yes
IPADDR=10.10.10.3
NETMASK=255.255.255.0
Bring up the interface
$ sudo ifup eth0
Connection successfully activated (D-Bus active path: /org/freedesktop/NetworkManager/ActiveConnection/6)
Confirm IP Address
$ ip addr show dev eth0
11: eth0: <BROADCAST,MULTICAST,UP,LOWER_UP> mtu 1500 qdisc mq state UP group default qlen 1000
    link/ether 86:90:80:e0:42:a0 brd ff:ff:ff:ff:ff:ff
    inet 10.10.10.3/24 brd 10.10.10.255 scope global noprefixroute eth0
       valid_lft forever preferred_lft forever
    inet6 fe80::8490:80ff:fee0:42a0/64 scope link
       valid_lft forever preferred_lft forever
Do a ping test from server1 to server2
$ ping -c 2 10.10.10.3
PING 10.10.10.3 (10.10.10.3) 56(84) bytes of data.
64 bytes from 10.10.10.3: icmp_seq=1 ttl=64 time=1.18 ms
64 bytes from 10.10.10.3: icmp_seq=2 ttl=64 time=0.593 ms

--- 10.10.10.3 ping statistics ---
2 packets transmitted, 2 received, 0% packet loss, time 1003ms
rtt min/avg/max/mdev = 0.593/0.884/1.175/0.291 ms
Do the same from server2 to server1:
$ ping -c 2 10.10.10.2
PING 10.10.10.2 (10.10.10.2) 56(84) bytes of data.
64 bytes from 10.10.10.2: icmp_seq=1 ttl=64 time=0.841 ms
64 bytes from 10.10.10.2: icmp_seq=2 ttl=64 time=0.472 ms

--- 10.10.10.2 ping statistics ---
2 packets transmitted, 2 received, 0% packet loss, time 2ms
rtt min/avg/max/mdev = 0.472/0.656/0.841/0.186 ms
We can confirm the private network is working fine. You can now proceed to configure your applications to use the internal network we just added.
More articles on Xen Virtualization:
- Enable Nested Virtualization on Xen | XCP-ng Virtual Machine
- Deploy Xen Orchestra Appliance on Xen/XCP-ng from CLI
- Add and Use ISO Library Storage Repository in Xen XCP-ng
- Managing XCP-ng Hypervisor with XenCenter | XCP-ng Center
Leave a Reply
You must be logged in to post a comment.