One of Auto GPT’s unique characteristics is its ability to link together many instances of GPT-4 or GPT-3.5, allowing it to use other resource if it is overloaded. This article will walk you through the process of installing and running your own version of Auto GPT in Linux.
Table of Contents
How to Set Up Auto GPT
Requirements
- Python 3.8 or later
- Latest version of Git
- OpenAI account.
Install Python 3.8
To install Python 3.8 on your system, follow these steps:

- Visit the official Python download page at https://www.python.org/downloads/.
- Scroll down to the “Python 3.8.x” section and click the appropriate link for your operating system.
- On the next page, scroll down to the “Files” section and select the appropriate installer for your system.
- Download the installer and run it on your computer.
- Follow the installation wizard and select the desired options.
- Once the installation is complete, you can verify the installation by opening a terminal and typing python3 –version. If Python 3.8.x is installed correctly, you should see the version number displayed in the output.
Install Git
To download or “pull” Auto GPT from GitHub, we will require Git. For time being, simply install it and we’ll show you how to utilize it later. Because the Git installation process differs per operating system, we will not go into depth. You may install Git on your PC by following the official tutorial.
Install virtualenvwrapper
Python utilities virtualenv and virtualenvwrapper allow you keep each project distinct. Some packages in some projects may conflict with other packages in other projects. Virtualenv is used to prevent conflicts. It’s similar to a Python sandbox.
It’s also more practical to maintain each project in its own setting. It is advised that you utilize it for Auto GPT, although it is not required.
open a terminal and run the following command:
pip install virtualenvwrapperCreate and Activate a Virtual Environment
It will be quite simple to construct and maintain virtual environments now that you have installed virtualenvwrapper. Let’s start by building the real virtual environment for our Auto GPT software. Simply execute the following command to accomplish this:
mkvirtualenv autogptClone Auto GPT GitHub Repo
Now, we have installed all the requirements, let’s finally install Auto GPT. To do so, browse to the appropriate folder and run the following command:
# Navigate to your installation folder and enter this cmd
git clone https://github.com/Significant-Gravitas/Auto-GPT
After downloading, navigate to the Auto-GPT directory using the cd Auto-GPT command. Once inside, you’ll need to install certain Auto-GPT dependencies. Execute the following command:
cd Auto-GPTOnce inside, you’ll need to install certain Auto-GPT dependencies. Execute the following command:
pip install -r requirements.txtThe next step is to obtain our OpenAI API key.
How to Create OpenAI API Keys
To generate your OpenAI API keys, go to your OpenAI account settings. Take the following steps:

- Log in to your OpenAI account at https://platform.openai.com/.
- Click on your profile image, located in the upper-right corner of the page.
- In the dropdown menu that appears, click on “Settings.”
- Choose “API keys” from the menu on the left-hand side of the page.
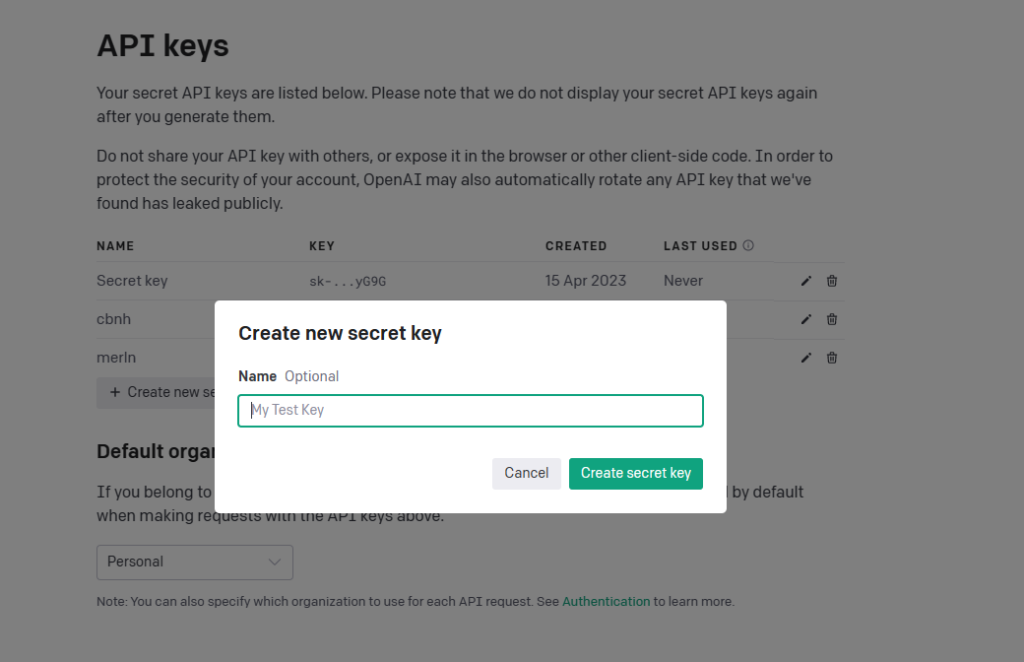
- Click the “Create new secret key” button to generate a new API key.
- Give the API key a name that you will remember and press the “Create” button.
- The API key will be generated, and you will not be able to access the whole key again, so make a note of it and keep it safe.
- To remove an API key, click the “Delete” button next to the key you wish to delete and confirm the action in the pop-up box.
It is important to note that removing an API key is irreversible, and you will not be able to recover it.
Edit the .env.template File
To prepare for running Auto GPT, you will need to edit the .env.template file located in the repository folder. Here are the steps:
- Rename the .env.template file to .env, including the dot in front of “env”.
- Open the .env file using your preferred text editor.
- Paste your OpenAI API key into the file.
- Save the .env file.
Run Auto GPT
We can now run the Auto-GPT after all of our installations. Simply browse to the Auto-GPT directory in your terminal or PowerShell and perform the following command:
python -m autogptIf nothing happens, ensure that your environment is active by executing the following command:
workon autogptIf the python command does not work, try this:
py -m autogptIf everything is in order, the app will greet you and prompt you to give your AI agent a name and goals.
You’ve just installed and run your own Auto GPT instance!
If you want to know more about Auto GPT read our Auto-GPT guide article.
This article is to help readers gain a better understanding of How to download and install Auto GPT in linux. We trust that it has been helpful to you. Please feel free to share your thoughts and feedback in the comment section below.
Leave a Reply
You must be logged in to post a comment.