Learn how to – How To Install and Use KVM on CentOS Stream 8.
In today’s guide we will be installing KVM on CentOS Stream 8 Linux operating system. KVM (Kernel-based Virtual Machine) is an open source virtualization technology built into Linux Kernel. KVM can be used on any x86 hardware with virtualization extensions (Intel VT or AMD-V). The role of KVM as hypervisor is specification of the host resources – Memory, CPUs, and virtual devices availed to the virtual machine instances being defined.
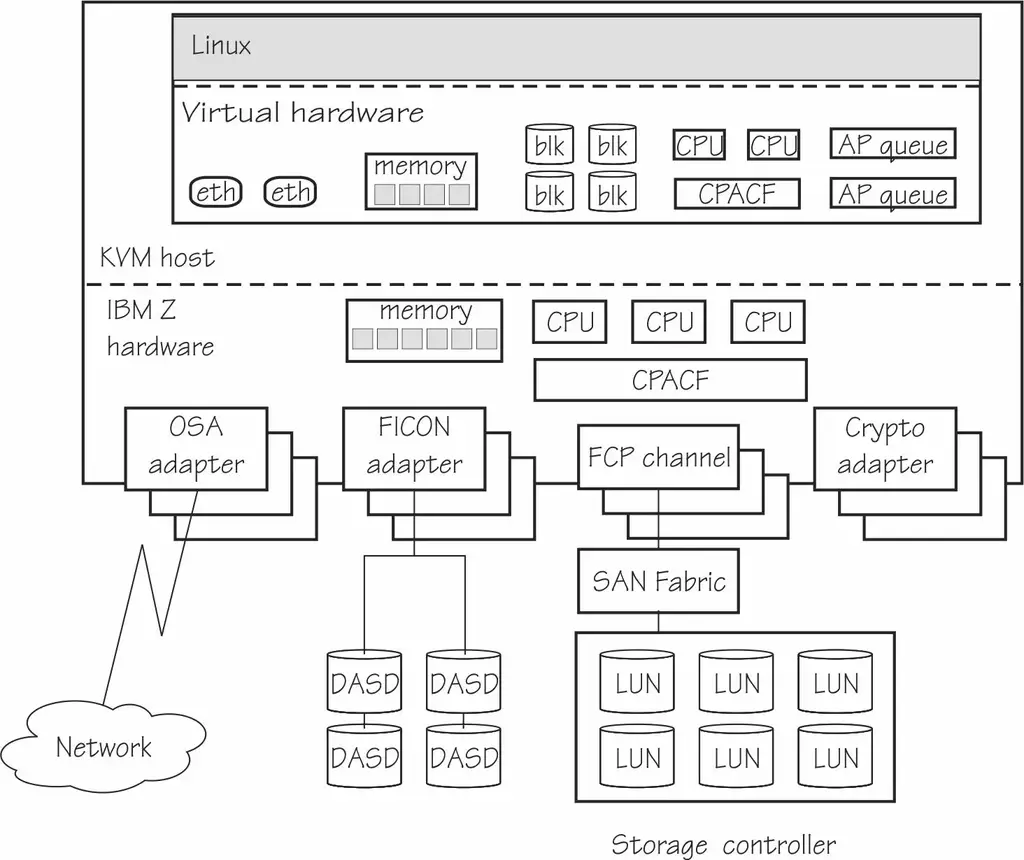
KVM consists of a loadable kernel module, kvm.ko, that provides the core virtualization infrastructure and a processor specific module, kvm-intel.ko or kvm-amd.ko. Below diagram illustrates how the KVM hypervisor virtualizes the compute resources for Linux on KVM.

Step 1: Confirm Virtualization extensions availability
Your hardware needs to have CPU virtualization extensions; Intel VT for Intel or AMD-V for AMD processor. In some systems, this is disabled on BIOS and you may need to enable it.
$ cat /proc/cpuinfo | egrep --color "vmx|svm"The lscpu command can also be used to check for virtualization CPU extensions:
$ lscpu | grep Virtualization
Virtualization: VT-x
This confirms I have Intel processor and VT-x extension
Step 2: Install KVM Virtualization Tools on CentOS Stream 8
Let’s start by performing system upgrades to use Kernel updates that could be available.
sudo dnf -y update
If there are Kernel related updates consider performing system reboot then install KVM Virtualization Tools on CentOS Stream 8:
sudo dnf install @virtAccept installation by pressing the y key:
Transaction Summary
==================================================================================================================================================================
Install  166 Packages

Total download size: 99 M
Installed size: 352 M
Is this ok [y/N]: y
Check if Kernel modules are loaded:
$ lsmod | grep kvm
kvm_intel             315392  0
kvm                   847872  1 kvm_intel
irqbypass              16384  1 kvm
Step 3: Install other KVM Management Tools
Let’s perform installation of other tools that helps with the management of Virtual Machines on KVM:
sudo dnf -y install bridge-utils virt-top libvirt-devel libguestfs-toolsWe have an example guide showing how libguestfs-tools can be used: How to mount VM virtual disk on KVM hypervisor
Step 4: Start and enable KVM daemon
By default, KVM daemon libvirtd is not started, start the service using the command:
sudo systemctl start libvirtdAlso enable the service to be started at system boot:
sudo systemctl enable libvirtdCheck if service is started successfully:
$ systemctl status libvirtd
● libvirtd.service - Virtualization daemon
   Loaded: loaded (/usr/lib/systemd/system/libvirtd.service; enabled; vendor preset: enabled)
   Active: active (running) since Mon 2021-06-21 20:29:16 CEST; 59s ago
     Docs: man:libvirtd(8)
           https://libvirt.org
 Main PID: 23126 (libvirtd)
    Tasks: 19 (limit: 32768)
   Memory: 15.3M
   CGroup: /system.slice/libvirtd.service
           ├─23126 /usr/sbin/libvirtd --timeout 120
           ├─23251 /usr/sbin/dnsmasq --conf-file=/var/lib/libvirt/dnsmasq/default.conf --leasefile-ro --dhcp-script=/usr/libexec/libvirt_leaseshelper
           └─23252 /usr/sbin/dnsmasq --conf-file=/var/lib/libvirt/dnsmasq/default.conf --leasefile-ro --dhcp-script=/usr/libexec/libvirt_leaseshelper

Jun 21 20:29:17 kvm-desktop dnsmasq[23251]: reading /etc/resolv.conf
Jun 21 20:29:17 kvm-desktop dnsmasq[23251]: using nameserver 213.133.100.100#53
Jun 21 20:29:17 kvm-desktop dnsmasq[23251]: using nameserver 213.133.99.99#53
Jun 21 20:29:17 kvm-desktop dnsmasq[23251]: using nameserver 213.133.98.98#53
Jun 21 20:29:17 kvm-desktop dnsmasq[23251]: using nameserver 2a01:4f8:0:1::add:9898#53
Jun 21 20:29:17 kvm-desktop dnsmasq[23251]: using nameserver 2a01:4f8:0:1::add:1010#53
Jun 21 20:29:17 kvm-desktop dnsmasq[23251]: using nameserver 2a01:4f8:0:1::add:9999#53
Jun 21 20:29:17 kvm-desktop dnsmasq[23251]: read /etc/hosts - 9 addresses
Jun 21 20:29:17 kvm-desktop dnsmasq[23251]: read /var/lib/libvirt/dnsmasq/default.addnhosts - 0 addresses
Jun 21 20:29:17 kvm-desktop dnsmasq-dhcp[23251]: read /var/lib/libvirt/dnsmasq/default.hostsfile
Step 5: Install Virtual machine Manager GUI – Optional
If running a Desktop Environment on your CentOS Stream 8, you can install the virt-manager package which provides Desktop Management application for your KVM Virtual Machines.
sudo dnf install virt-managerBegin installation of Virt-manager on CentOS Stream 8:
Installing weak dependencies:
 abattis-cantarell-fonts                      noarch                    0.0.25-6.el8                                           appstream                    156 k
 dejavu-sans-mono-fonts                       noarch                    2.35-7.el8                                             baseos                       447 k

Transaction Summary
==================================================================================================================================================================
Install  62 Packages

Total download size: 27 M
Installed size: 83 M
Is this ok [y/N]: y
Step 6: Network Bridge Creation for KVM instances (Optional)
The Linux bridge virbr0 is created at the time of installation and can be used to create Virtual Machines that doesn’t need external IP connectivity. It uses NAT to give VMs internet access.
$ brctl show
bridge name	bridge id		STP enabled	interfaces
virbr0		8000.525400876bb5	yes		virbr0-nic
If you need a bridge with external connections support, refer to the guide below on creation:
How to Create a Linux Network Bridge on RHEL / CentOS 8
Step 7: Create Virtual Machines on KVM
You can use virt-install command to create a Linux Virtual Machine on KVM.
I’ll download CentOS Stream 8 DVD installation ISO file
cd ~/
wget http://centos.mirror.liquidtelecom.com/8-stream/isos/x86_64/CentOS-Stream-8-x86_64-latest-dvd1.iso
VM installation using virt-install:
virt-install
--name centos-stream-8
--ram 2048
--vcpus 2
--disk path=/var/lib/libvirt/images/centos-stream-8.img,size=20
--os-variant centos-stream8
--os-type linux
--network bridge=virbr0
--graphics none
--console pty,target_type=serial
--location ~/CentOS-Stream-8-x86_64-latest-dvd1.iso
--extra-args 'console=ttyS0,115200n8 serial'
The installation is on text mode but the procedure of installation is similar to GUI. After finishing the installation, reboot the instance and login
CentOS Stream 8
Kernel 4.18.0-240.el8.x86_64 on an x86_64

Activate the web console with: systemctl enable --now cockpit.socket

localhost login:
You can also login through console:
$ virsh console centos-stream-8Press <ENTER> key on getting:
Escape character is ^]More guides on KVM:
- How to Create CentOS / Fedora / RHEL VM Templates on KVM
- Virsh Commands cheat sheet
- How to Provision VMs on KVM with Terraform
- Configure virt-manager as a non-root user on Linux
Leave a Reply
You must be logged in to post a comment.