Asterisk, a popular open-source platform for developing communication applications and is used by a lot of people. Voicemail, On hold music, conference calling, call recording, interactive voice response, and much more are the features of Asterisk platform. In this tutorial we will learn how to install and setup Asterisk in Ubntu 20.04
This setup is tested on Google Compute Engine VM Instance running Ubuntu 20.04 LTS.
This setup will work fine for any virtual machine on AWS EC2 Instance or DigitalOcean or any other cloud hosting servers or VPS or Dedicated.
Prerequisites
- A running Compute Engine, see the Setting up Compute Engine Instance with Ubuntu 20.04.
- Basic knowledge and understanding about Linux commands
- Install the necessary packages to download and build Asterisk
sudo apt update
sudo apt install wget build-essential git autoconf subversion pkg-config libtool
Installing DAHDI and LibPRI
DAHDI drivers and utilities are used to communicate with telephones and the LibPRI library is used to communicate with ISDN connections.
Now let us download and install DAHDI in /usr/src directory
cd /usr/src/
sudo git clone -b next git://git.asterisk.org/dahdi/linux dahdi-linuxcd dahdi-linux
sudo make
sudo make install

cd /usr/src/
sudo git clone -b next git://git.asterisk.org/dahdi/tools dahdi-tools
cd dahdi-tools
sudo autoreconf -i
sudo ./configure
sudo make install
sudo make install-config
sudo dahdi_genconf modules
Now let us build LibPRI in /usr/src directory
cd /usr/src/
sudo git clone https://gerrit.asterisk.org/libpri libpri
cd libpri
sudo make
sudo make install
Install Asterisk
Install Asterisk18.x source in the /usr/src directory
cd /usr/src/
sudo git clone -b 18 https://gerrit.asterisk.org/asterisk asterisk-18
Switch to Asterisk directory
cd asterisk-18/
Download MP3 sources to build the MP3 module
sudo contrib/scripts/get_mp3_source.sh
Now run install_prereq to install necessary dependencies
sudo contrib/scripts/install_prereq install
Check if we have all the requied dependencies using the configure script
sudo ./configure
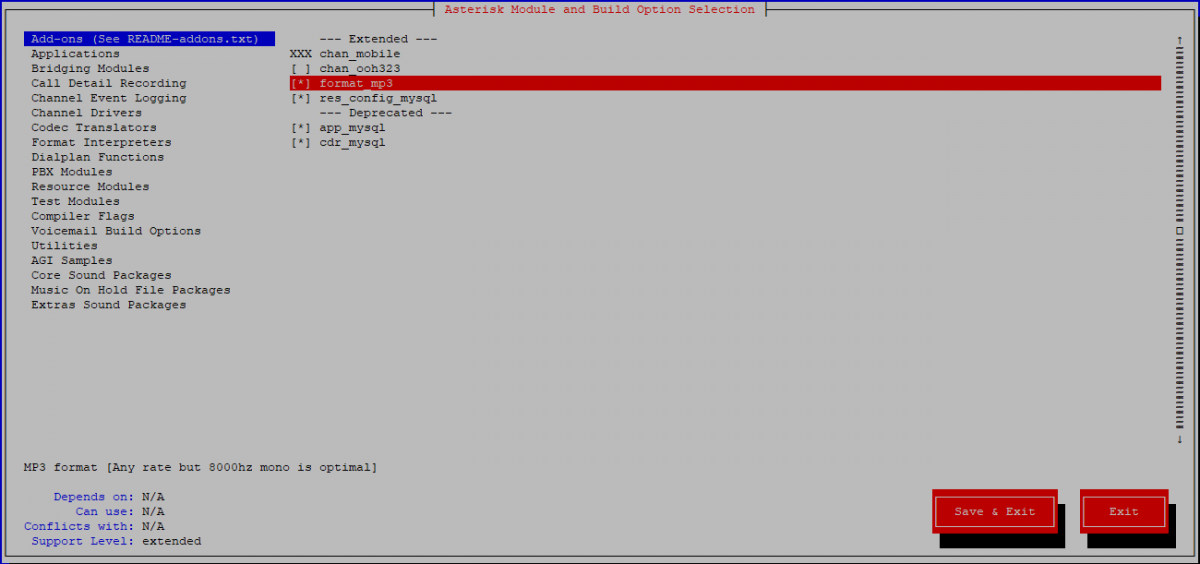
Now open menuselect and choose the format_mp3 option
sudo make menuselect
You will see the menuselect window, choose the format_mp3 option and Save & Exit
Now start the compilation process, modify the -j flag with the number of cores in your processor. This will take some time depending on your system capacity

Now let’s install Asterisk and its modules
sudo make install
Installing Sample Files
Install sample configuration files for Asterisk
sudo make samples
Now install the initialization script to start Asterisk when your server starts
sudo make config
install logrotate to rotate log files and save disk space
sudo make install-logrotate
Now run ldconfig to update shared libraries cache
sudo ldconfig
Create Asterisk User
For security reasons we will create a new system user asterisk and configure Asterisk to run as new user
sudo adduser --system --group --home /var/lib/asterisk --no-create-home --gecos "Asterisk PBX" asterisk
Open the /etc/default/asterisk file and uncomment the following lines
AST_USER="asterisk"
AST_GROUP="asterisk"
Add the asterisk user to the dialout and audio groups
sudo usermod -a -G dialout,audio asterisk
Now we need to update the permissions of all asterisk files and directories so that new user can access those files
sudo chown -R asterisk: /var/{lib,log,run,spool}/asterisk /usr/lib/asterisk /etc/asterisk
sudo chmod -R 750 /var/{lib,log,run,spool}/asterisk /usr/lib/asterisk /etc/asterisk
Start Asterisk
Now we can start the Asterisk service
sudo systemctl start asterisk
We can verify Asterisk is running by connecting to the Asterisk CLI
sudo asterisk -vvvr
You must see something like this
Connected to Asterisk 18.1.1 currently running on asterisk (pid = 104513)
asterisk*CLI>
Now setup Asterisk service to start on boot
sudo systemctl enable asterisk
Configure Firewall
Now let us setup firewall to secure our server. Open UDP port 5060
sudo ufw allow 5060/udp
Feel free to adjust the firewall according to your needs.
Conclusion
Now you have learned how to install Asterisk in Ubuntu 20.04
Thank you very much for your time. If you face any problem or if you have any feedback, please leave a comment below.
Leave a Reply
You must be logged in to post a comment.